Elasticsearch基础教程
Elasticsearch是一个实时的分布式搜索分析引擎,底层基于Lucene实现。它提供了一个分布式多用户能力的全文搜索引擎,并且客户端可以使用标准的RESTful进行访问。Elasticsearch是用Java开发的,并作为Apache许可条款下的开放源码发布,是当前流行的企业级搜索引擎。设计用于云计算中,能够达到实时搜索,稳定,可靠,快速,安装使用方便。
传统的搜索做法主要以是基于系统或应用的查询功能进行查找,或者使用数据库的模糊查询等机制来完成。这些方式相对简单,对于少量数据来说操作性比较方便。但对于海量数据,性能就会急剧下降导致不能及时响应,且不易于扩展。而使用搜索引擎的好处在于,它可以存储非结构化的数据,进行相关的排序、过滤以及分词等功能,快速检索我们需要的数据信息。
1. 安装与配置
1.1 下载
可以从官网下载最新版本: https://www.elastic.co/cn/products/
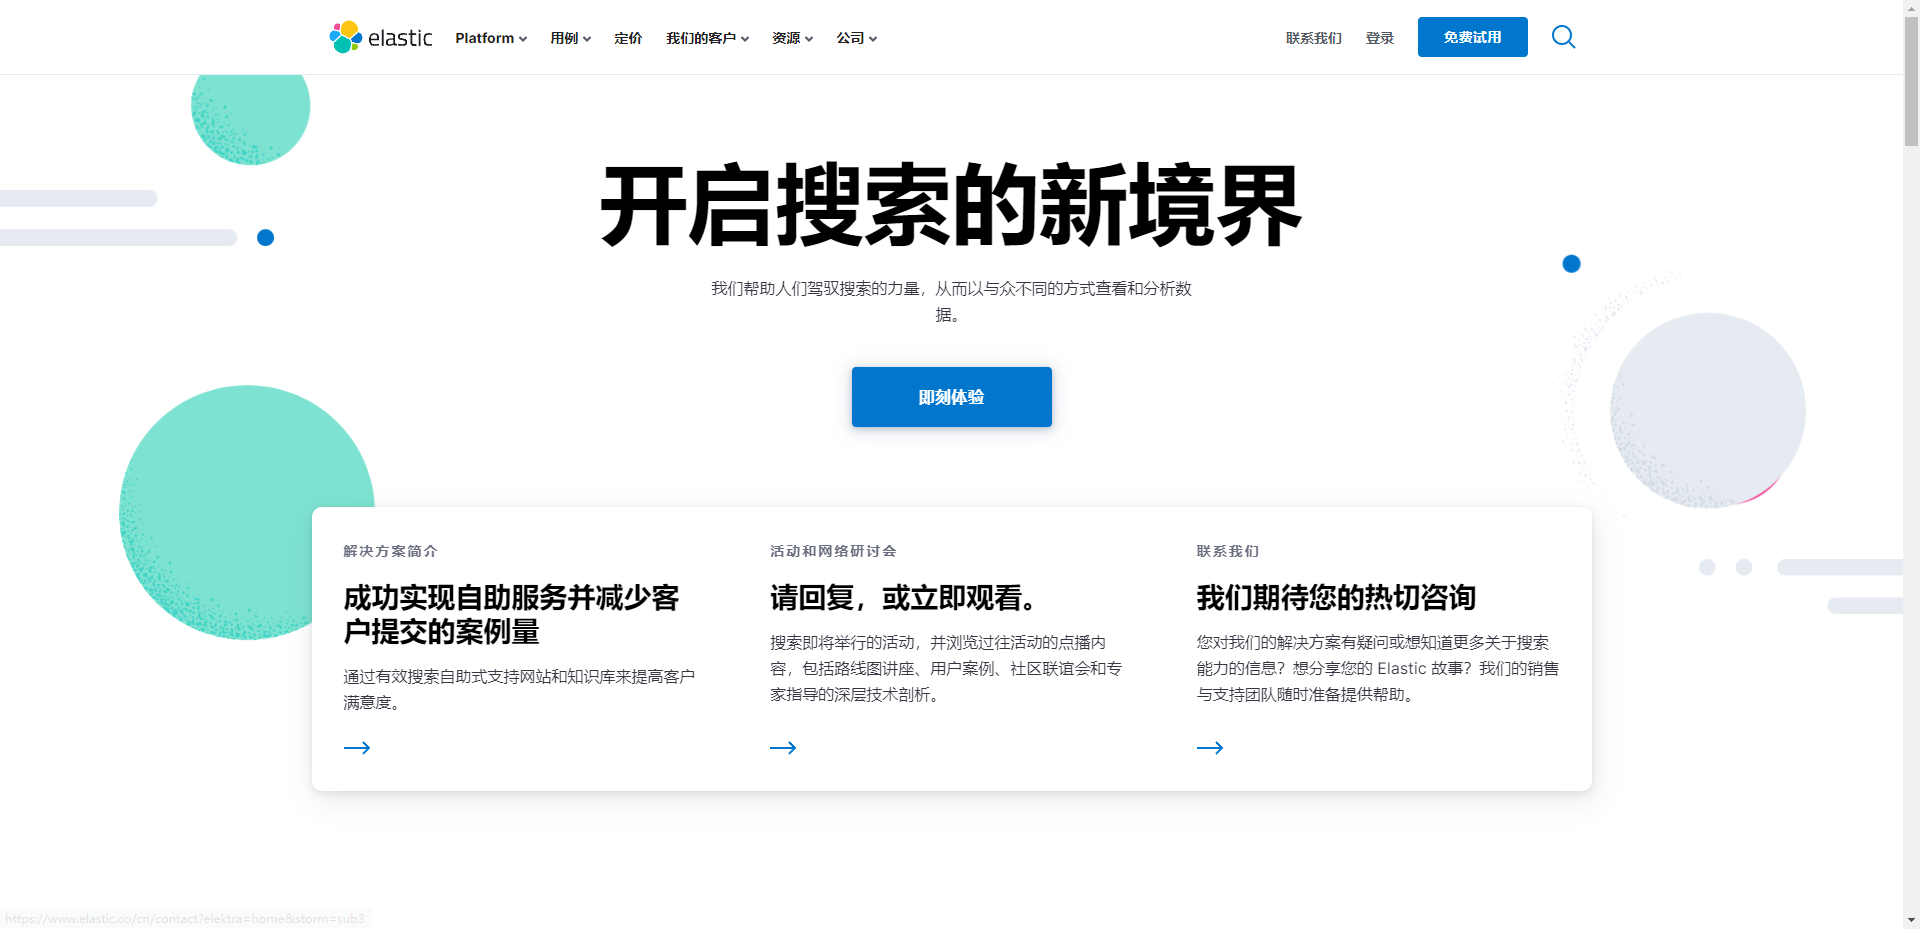
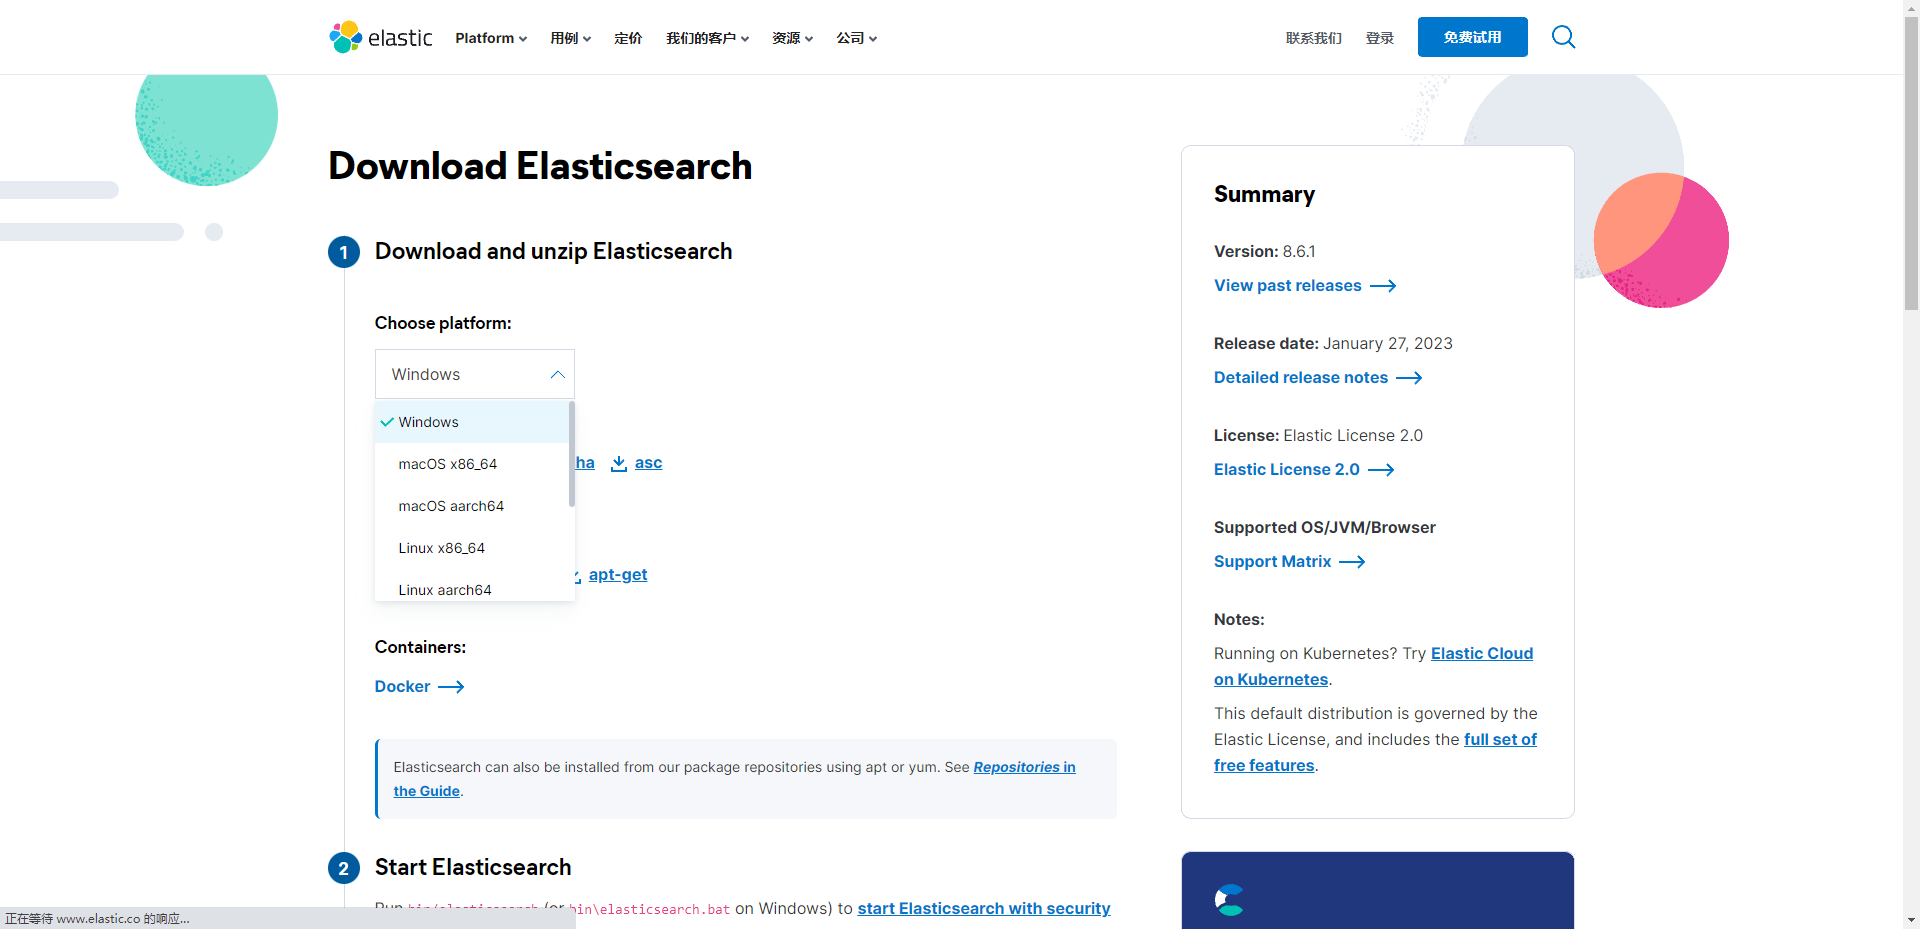
根据不同的系统平台下载相应的压缩包。
1.2 目录结构
下载完成后解压到任意目录即可,下面对elasticsearch目录进行简要说明。

| 目录 | 说明 |
|---|---|
| bin | 运行目录,包含elasticsearch启动程序等 |
| config | 配置目录,存放elsticsearch的相关配置文件 |
| data | 存放ES节点数据的目录 |
| jdk | 从7.0开始自带JDK运行环境 |
| lib | 运行时所需的类库 |
| logs | 存放elasticsearch运行时产生的日志 |
| modules | 模块目录 |
| plugins | 插件目录 |
1.3 启动服务
进入bin录下,运行elasticsearch程序即可。
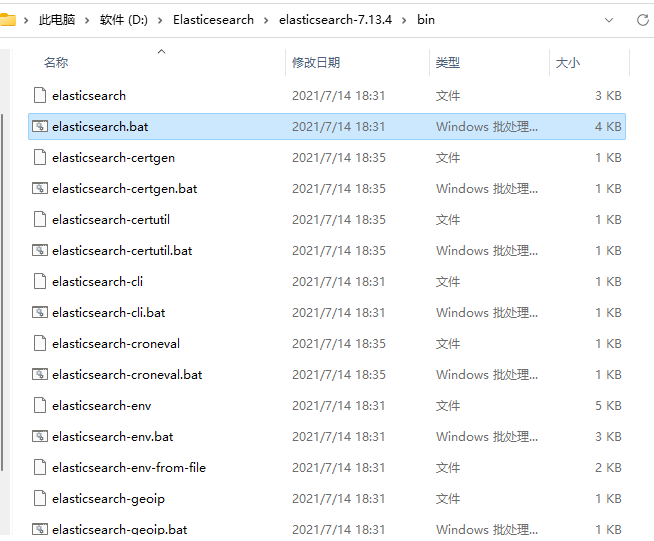
启动完成后可以在浏览器输入http://localhost:9200访问,elasticsearch默认端口为9200。
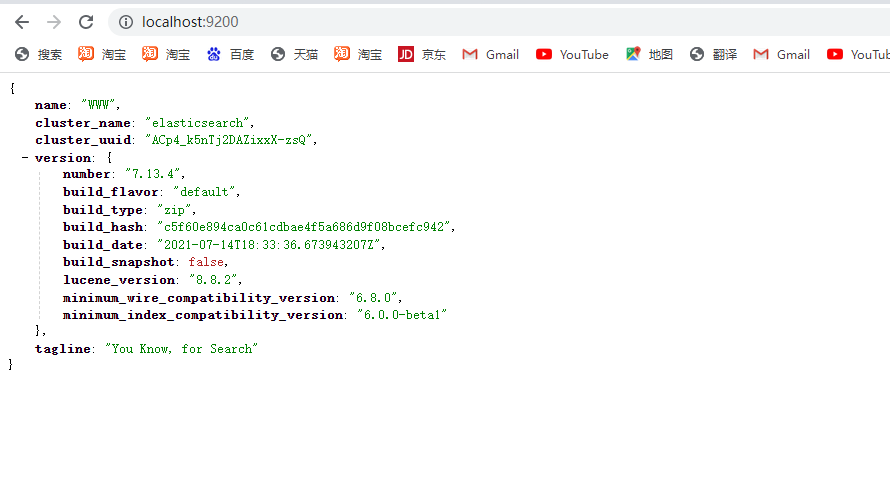
如果能访问到以上的JSON信息表示elasticsearch正常运行。
1.4 安装中文分词
在进行内容检索时,通常会用到中文检索,那么可以额外为es添加中文分词器,比较常见的中文分词插件如:analysis-ik、庖丁解牛等。(注意:分词器要对应ES的版本)
安装analysis-ik,打开终端并进入ES的目录,执行以下命令:
./bin/elasticsearch-plugin install https://github.com/medcl/elasticsearch-analysis-ik/releases/download/v7.0.0/elasticsearch-analysis-ik-7.0.0.zipik支持两种分词模式:
- ik_max_word: 会将文本做最细粒度的拆分,会穷尽各种可能的组合
- ik_smart: 会做最粗粒度的拆分
1.5 核心配置文件
在config目下有一个核心配置文件elasticsearch.yml,这个文件主要用于elasticsearch的集群配置、节点配置、IP地址以及端口等信息的设置。
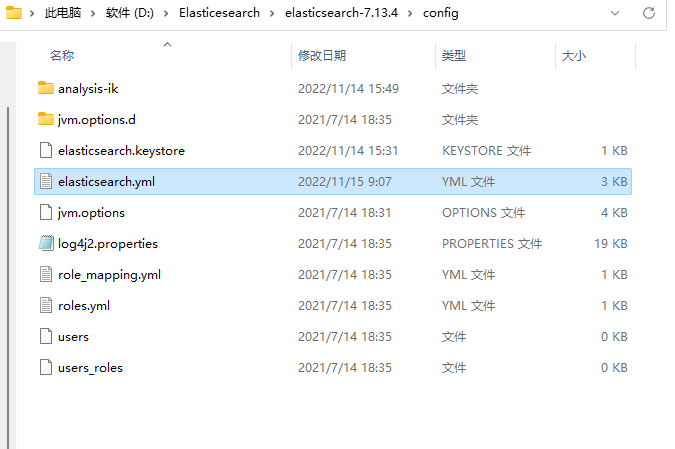
下面主要讲解一些常用的配置:
| 属性 | 说明 |
|---|---|
| cluster.name | 集群名称,在一个网段中的所有节点都设置为同一个集群名称时,会自动加入集群中 |
| node.name | 当前节点名称 |
| node.master | 是否参与master选举 |
| node.data | 是否为数据节点 |
| path.data | 存储数据的路径,默认开启 |
| path.logs | 存储日志的路径 |
| network.host | 当前节点对外暴露的IP地址 |
| http.port | 对外服务的http端口,默认9200 |
| http.cors.enabled | 启用跨域支持 |
| http.cors.allow-origin | 允许访问的域名 |
| discovery.seed_hosts | 用于设置集群发现 |
| cluster.initial_master_nodes | 指定需要成为mater的所有节点的name或者ip |
1.6 远程访问
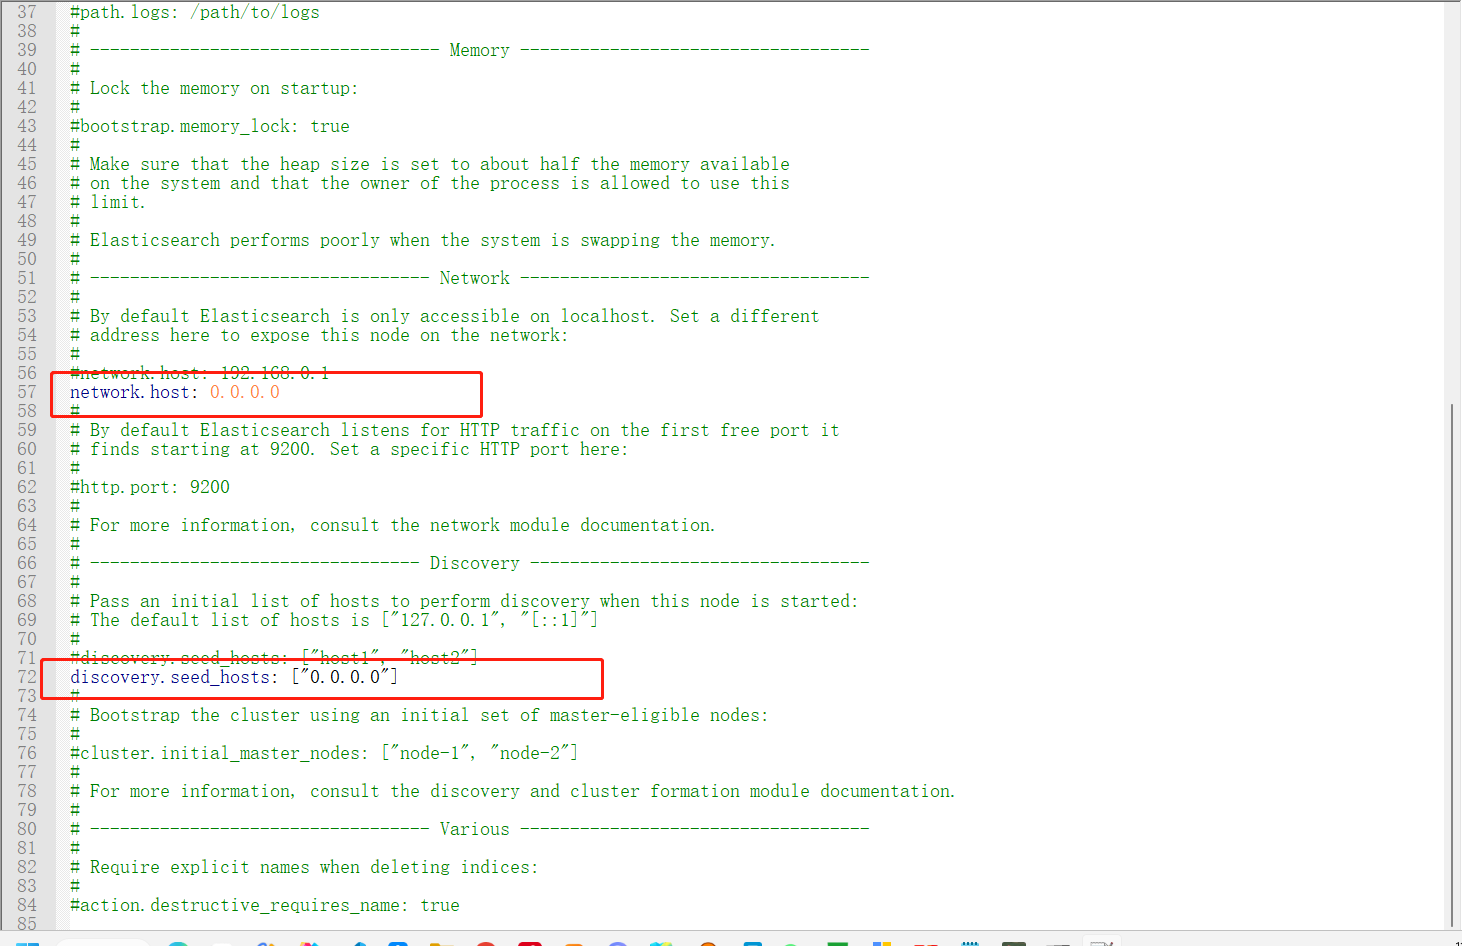
如果ES需要开放外网访问,需要在elasticsearch.yml中添加network.host和discovery.seed_hosts配置。
2. 基础入门
ES原生支持http协议并提供了丰富的Restful API。可以使用各种基于http协议的客户端软件来访问,如:curl、postman等工具,也可以使用官方提供的Kibana来访问ES,这里以postman为例。
2.1 Index
ElasticSearch中的一个Index(索引)类似于关系型数据库的一个库,它是最顶级的元素,在ES中可以创建多个Index,类似于创建了多个数据库。内部结构使用一个"_index"字段来标识索引的名称。
{
  "_index" : "users",
  ...
}
2.1.1 创建Index
PUT /index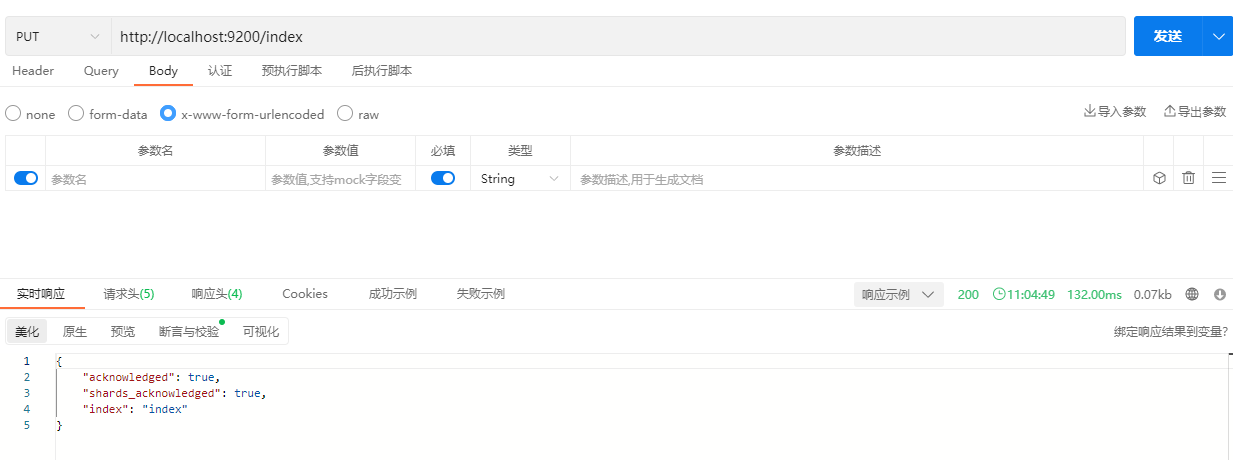
| 字段 | 说明 |
|---|---|
| acknowledged | acknowledged值为true表示创建成功 |
| shards_acknowledged | true表示已启用数据分片 |
| index | 创建的索引名称 |
2.1.2 查看Index
GET /index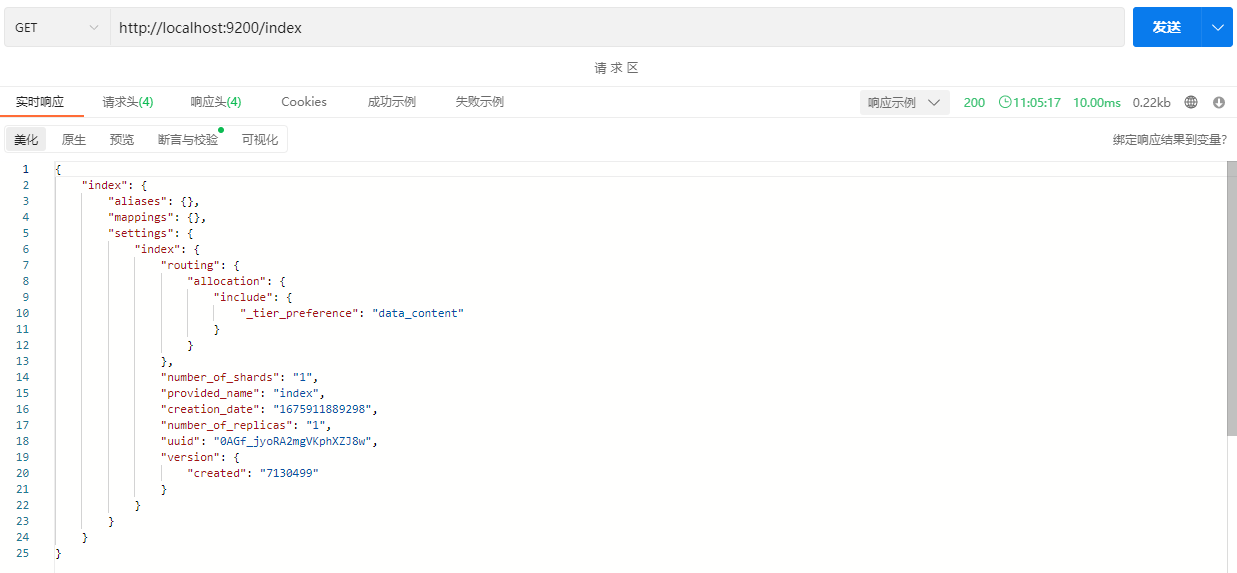
| 字段 | 说明 |
|---|---|
| aliases | 索引别名 |
| mappings | 文档字段映射(这里暂时没有创建) |
| settings | 索引的一些设置,包括创建时间,主节点分数量和副本数量,唯一标识符,版本号等设置 |
2.1.3关闭索引
POST /index/_close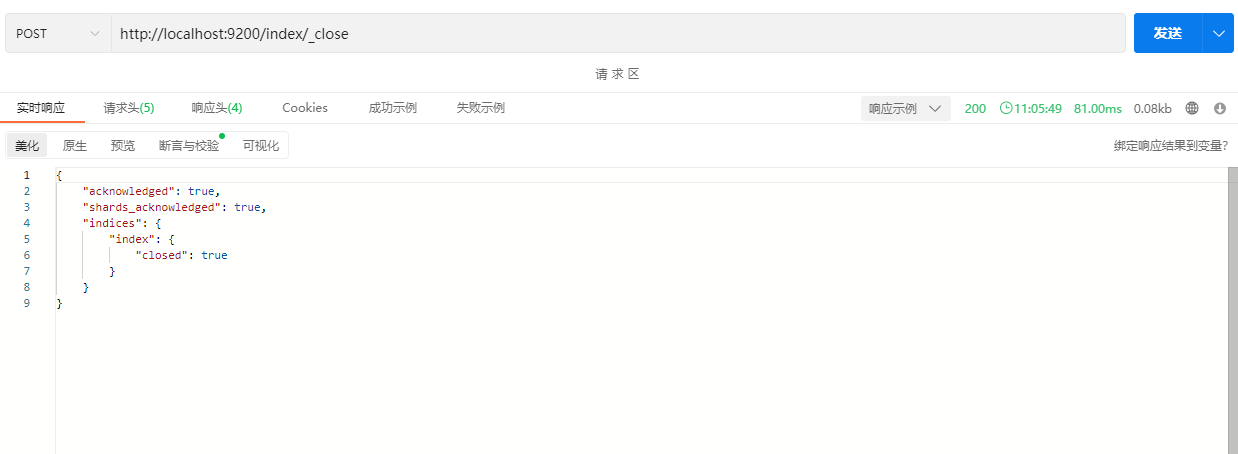
2.1.4 打开索引
POST /index/_open
2.1.5 删除Index
DELETE /index
2.1.6 查看所有Index信息
GET /_cat/indices
响应内容包含了es中所有的index的信息。我们看下users这个索引,其中yellow表示当前索引主分片可用,但副本不一定都可用。green表示当前索引在集群中健康良好。open表示当前索引是打开的。当然还包括uuid和索引容量等等其他信息。
2.2 Type
Type表示文档映射类型。不太确切地说,Type有点类似于数据库中的表。在早期的版本中,一个index下面可以创建多个type,但是从6.0开始,ES将type进行弱化,一个index中只能有一个type。在创建index时会包含一个个“_doc”这个默认的type。
{
    "_index": "usersinfo",
    "_type": "_doc"
    ...
}
2.3 Mapping
在ES中,Mapping用于映射文档的结构,例如文档中的每一个字段名以及数据类型都在Mapping中进行描述。在mapping里面有一个"properties"属性,文档的所有字段映射都放在properties中,例如下面的文档映射中包含age、birthplace、name三个字段。
{
    "users": {
        "mappings": {
            "properties": {
                "age": {
                    "type": "integer",
                    "index": false
                },
                "birthplace": {
                    "type": "text",
                    "analyzer": "ik_max_word"
                },
                "name": {
                    "type": "text",
                    "analyzer": "ik_max_word"
                }
            }
        }
    }
}
2.3.1 为index添加Mapping
PUT /index/_mapping
{
    "properties": {
        "name": {
            "type": "text",
      "analyzer": "ik_max_word"
        },
        "age": {
            "type": "integer",
            "index": false
        },
        "birthplace": {
            "type": "text",
      "analyzer": "ik_max_word"
        }
    }
}
示例:
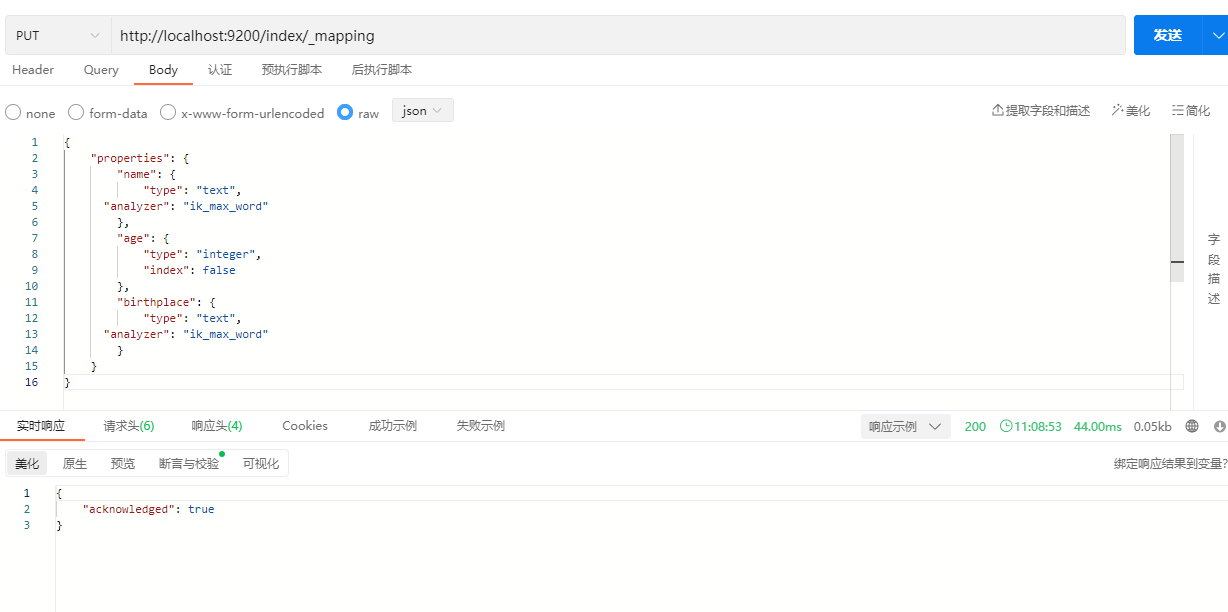
说明:
type:用于指定字段的类型,ES也提供了众多的数据类型共我们选择,下面列举一些常用的数据类型。
| 类型 | 说明 |
|---|---|
| text | 字符串,支持分词、全文检索、模糊、精确查询。不支持聚合、排序操作。长度无限制,适合大字段存储。 |
| keyword | 字符串,不分词,不支持全文搜索,所以只能是使用精确匹配进行查询。但直接索引、模糊、精确匹配、聚合、排序操作。长度为32766个UTF-8类型的字符。 |
| integer、long、short、byte | 整数类型 |
| double、float | 浮点类型 |
| boolean | 逻辑类型 |
| date | 日期类型,指定日期是还可以指定日期的格式化,如:{"type":"date", "format":"yyyy-MM-dd"} |
| binary | 二进制类型 |
| array | 数组类型 |
| object | 对象类型 |
| range | 范围类型 |
| ... | ... |
index:表示是否给当前字段设置分词,true为设置,false为不设置。
analyzer:用于设置分词器。ES内置很多的分词器,例如standard 分词器、simple 分词器、Whitespace 分词器等等,如果不指定分词器,默认则使用standard 分词器。而例子中使用的是自行安装的ik中文分词器。
2.3.2 查看Mapping映射
GET /index/_mapping示例:
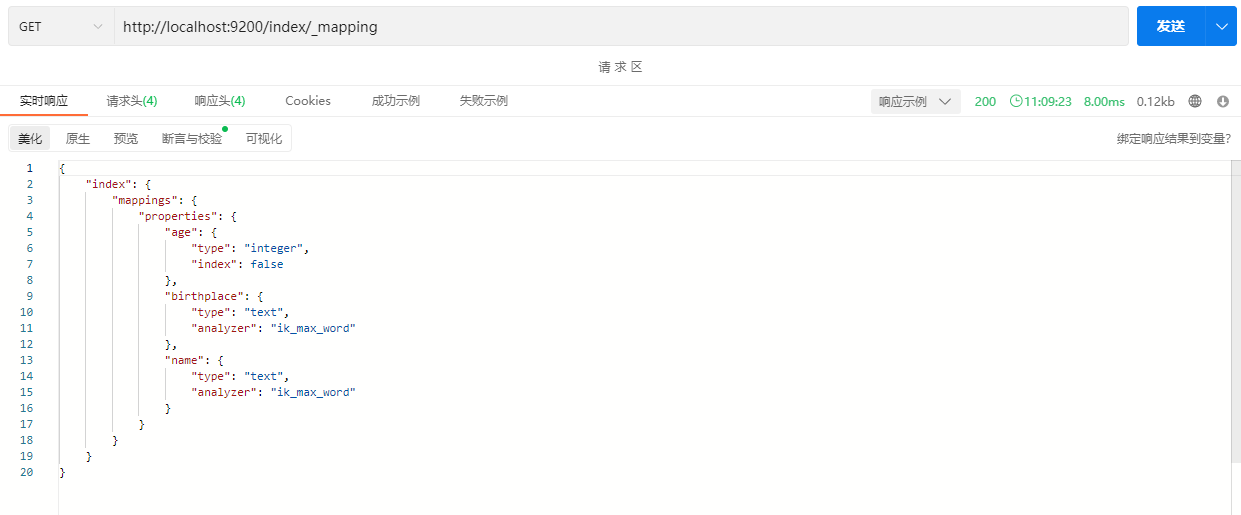
注意:查看mapping时时使用GET请求。
2.3.3 创建Index同时构建Mapping
PUT /index
{
    "mappings": {
        "properties": {
            "name": {
                "type": "text",
                "analyzer": "ik_max_word"
            },
            "age": {
                "type": "integer"
            },
            "birthplace": {
                "type": "text",
                "analyzer": "ik_max_word"
            }
        }
    }
}
示例:
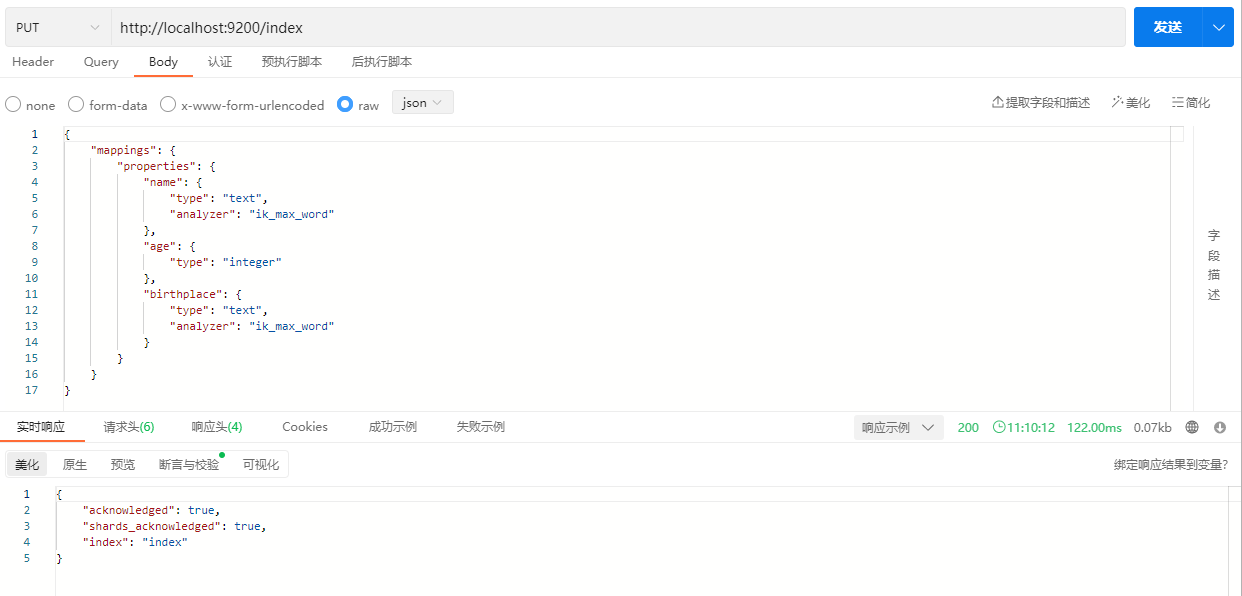
2.4 Document
Elasticsearch是面向文档的,因此文档在ES中是搜索的最小单位,而文档通常都会序列化成JSON的格式保存在ES中。一个文档由多个字段组成,每个字段拥有自己的类型,并且还有一个唯一的ID。在ES中一个"_source"字段,这个字段就是用于存储文档的原始json数据。
{
    "_index": "users",
    ...
    "_source": {
        "name": "张三",
        "age": 22,
        "birthplace": "珠海"
    }
}
2.4.1 创建文档记录
在设置好mapping之后,我们就可以在index中添加Document,类似于在数据库中插入一条记录。
PUT /index/_doc/id
{
    "name": "小明",
    "age": 21,
    "birthplace": "广州"
}
示例:

说明:_doc是默认也是每个index唯一的type,添加记录时需要加上。“1”表示给这条document记录自定义一个id(相当于主键),成功添加后将响应如下结果:

| 字段 | 说明 |
|---|---|
| _index | 前操作的索引 |
| _type | 默认的文档类型,也就是_doc |
| _id | 自定义的文档唯一标识 |
| _version | 表示当前记录的版本号 |
| _result | 执行的结果,created表示创建了一条记录 |
| _shard | 分片信息 |
| _seq_no | 每个文档对应一个递增的序列号,当执行任何写操作,如create、update、delete等操作时,都会生成一个_seq_no |
| _primary_term | 主要用来恢复数据时处理当多个文档的_seq_no一样时的冲突。每当重新分片或集群中的主节点选举时,_primary_term都会递增 |
当然,创建文档时也可以不指定id,此时ES将使用uuid作为唯一标识。需要注意的是,如果不指定id,必须使用POST请求。
POST /index/_doc
{
    "name": "小明",
    "age": 21,
    "birthplace": "广州"
}
在响应结果中可以看到"_id"字段使用了uuid串作为唯一标识。

2.4.2 根据ID获取文档信息
GET /index/_doc/id示例:
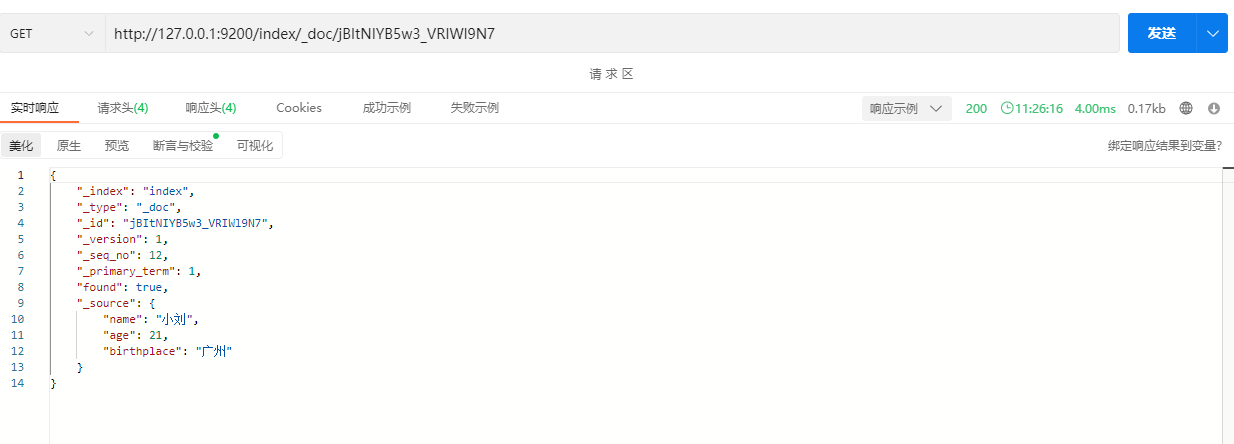
说明:"_source"字段的内容就是具体的文档信息
2.4.3 修改文档信息
PUT /index/_doc/id
{
    "name": "王小明",
    "age": 21,
    "birthplace": "深圳"
}
示例:

响应结果:
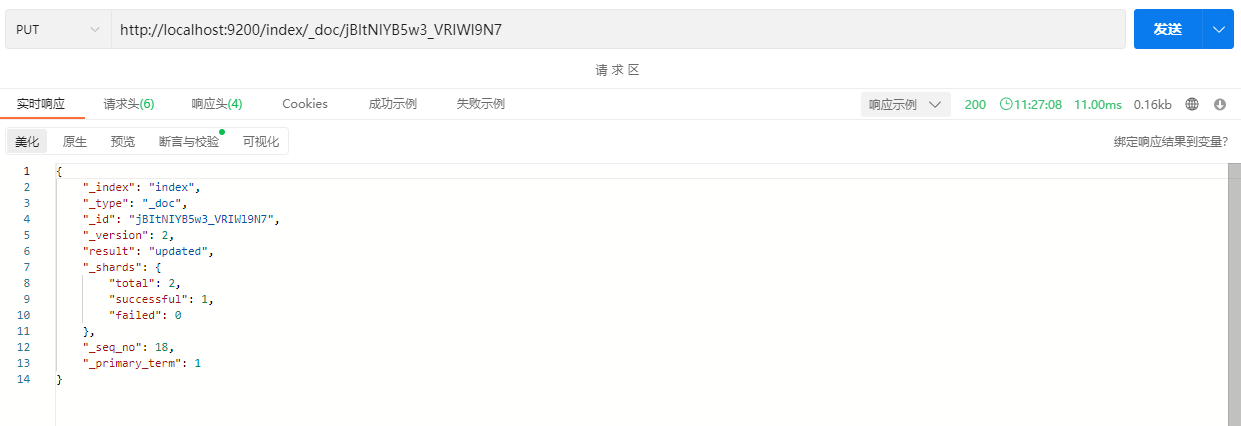
注意响应体中的“result”字段,此时为updated,表示更新了一条记录。
2.4.4 删除文档
DELETE /index/_doc/id示例:

响应结果:

此时在响应体中的“result”字段的内容为deleted,表示删除了一条记录。
2.5 文档检索
文档检索可以说是ES中最常用和最重要的功能了。ES中对文档搜索的方式有两种,一种是使用参数查询,查询参数可以使用简单的查询字符串作为参数并将其放在请求的url后面通过”?“号进行提交。另一种是将查询参数放入请求体中,而在请求体中通常使用ES提供的DSL查询语句进行检索,因此也成为DSL查询。在使用搜索时,会在请求的url中都会使用"_search"关键字进行检索。
2.5.1 查询索引下的所有记录
GET /index/_doc/_search示例:

返回的结果中hits表示查询的命中率,如下:
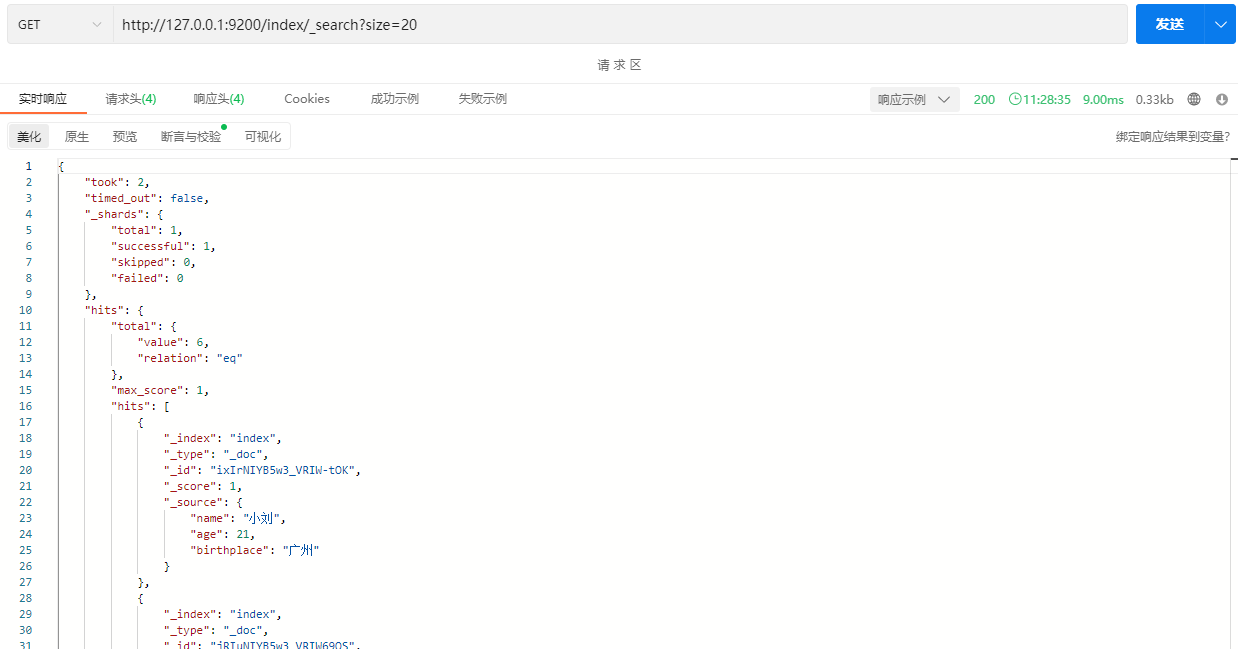
2.5.2 URI查询
URI查询是在请求的URL中使用“q”作为请求参数,将需要检索的字段名和对应的值提交给ES。
GET /index/_search?q=field:value示例:

响应结果:
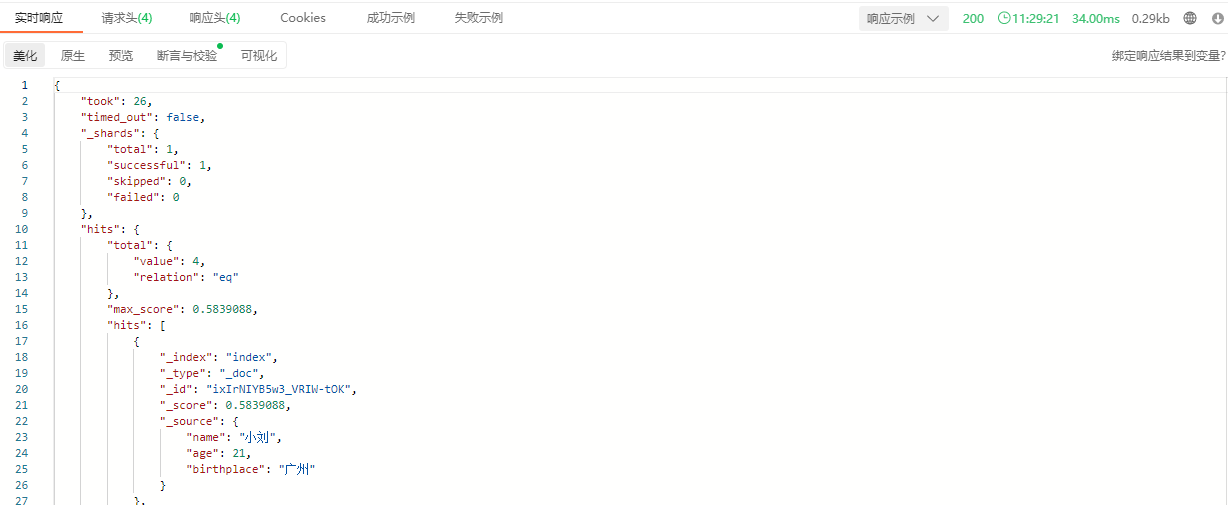
2.5.3 DSL查询
Query DSL又叫查询表达式,是一种非常灵活又富有表现力的查询语言,采用JSON接口的方式实现的查询。
term查询
term表示精确匹配,搜索前不会再对搜索的内容进行分词,因此我们搜索的词必须是文档分词集合中的一个。
GET /index/_search
{
    "query" : {
        "term" : {
                "birthplace" : "广州"
        }
    }
}
示例:

响应结果:
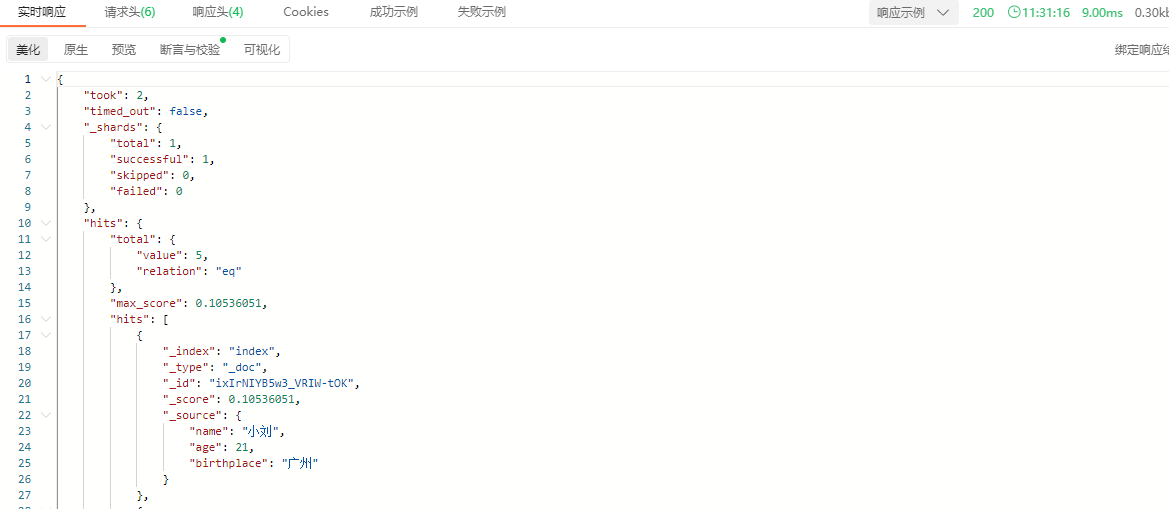
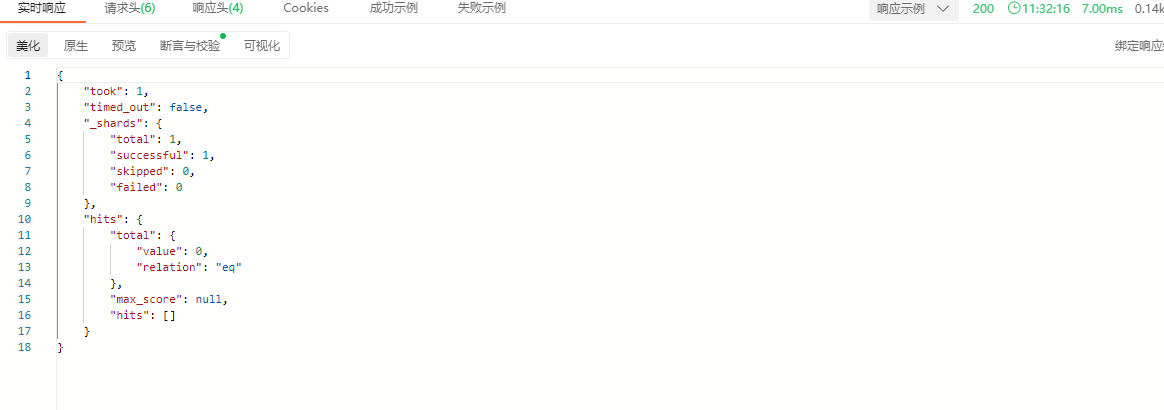
说明:首先创建文档信息时,ik中文分词器将birthplace字段的内容进行了分词。例如“广东省广州市”会分成“广东”、“广东省”、“广州”、“广州市”等等一系列的分词信息,因此在使用term进行检索的时候,只要输入的内容完全符合这些分词中的任意一个,都能成功匹配。但如果输入内容是“广东广州”,由于分词器并没有对齐进行这样的分词,因此是匹配不到结果的。
示例:

响应结果:
terms查询
terms用于在一个字段中精确匹配多个搜索词,值是一个数组。
GET /index/_search
{
    "query" : {
        "terms" : {
                "birthplace" : ["广州","深圳"]
        }
    }
}
示例:

响应结果:

match查询
match查询会先对搜索的内容进行分词,然后再对分词结果进行匹配。
GET /index/_search
{
    "query" : {
        "match" : {
                "birthplace" : "广州"
        }
    }
}
示例:

响应结果:

说明:match会对输入的内容进行分词处理,这是和term最根本的区别。在上面的劣质中由于输入的是“广州”这个词,因此得到了包含出生地为广州的用户信息。但如果将搜索条件改为“广东广州”,那么在进行检索前会将其分成“广东”和“广州”,所以搜索条件中出生地只要包含“广东”或者是“广州”的用户都会被搜索到。
示例:

响应结果:

因此会发现,含有“深圳”用户信息的也会被搜索出来,因为“广东省深圳市”中也包含了“广东”这个词。
multi_match查询
前面的term或者是match都是针对一个字段进行检索,而multi_match用于检索多个字段。
GET /index/_search
{
    "query" : {
        "multi_match" : {
            "query" : "广州",
            "fields" : ["name","birthplace"]
        }
    }
}
示例:

响应结果:
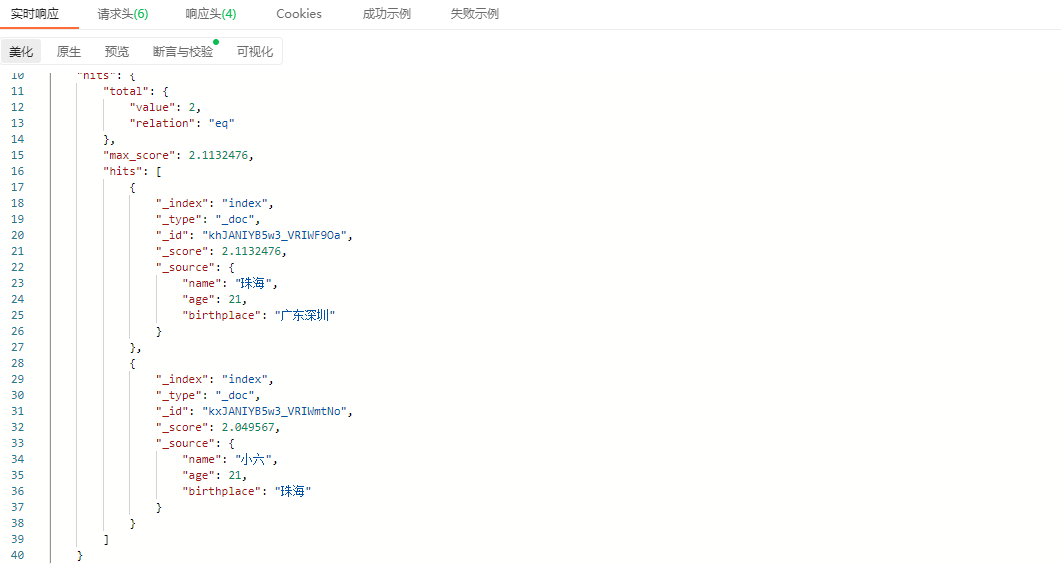
从结果看出,在name和birthplace字段中只要包含“广州”这个词的都会被检索到。
range查询
range表示范围查询,例如在文档中检索年龄大于等于20并且小于等于23的用户信息。
GET /index/_search
{
    "query": {
      "range": {
            "age": {
                  "gte": 20,
                  "lte": 23
            }
       }
   }
}
说明:
| 关键字 | 说明 |
|---|---|
| gte | ">=" |
| lte | "<=" |
| gt | ">" |
| lt | "<" |
示例:

响应结果:
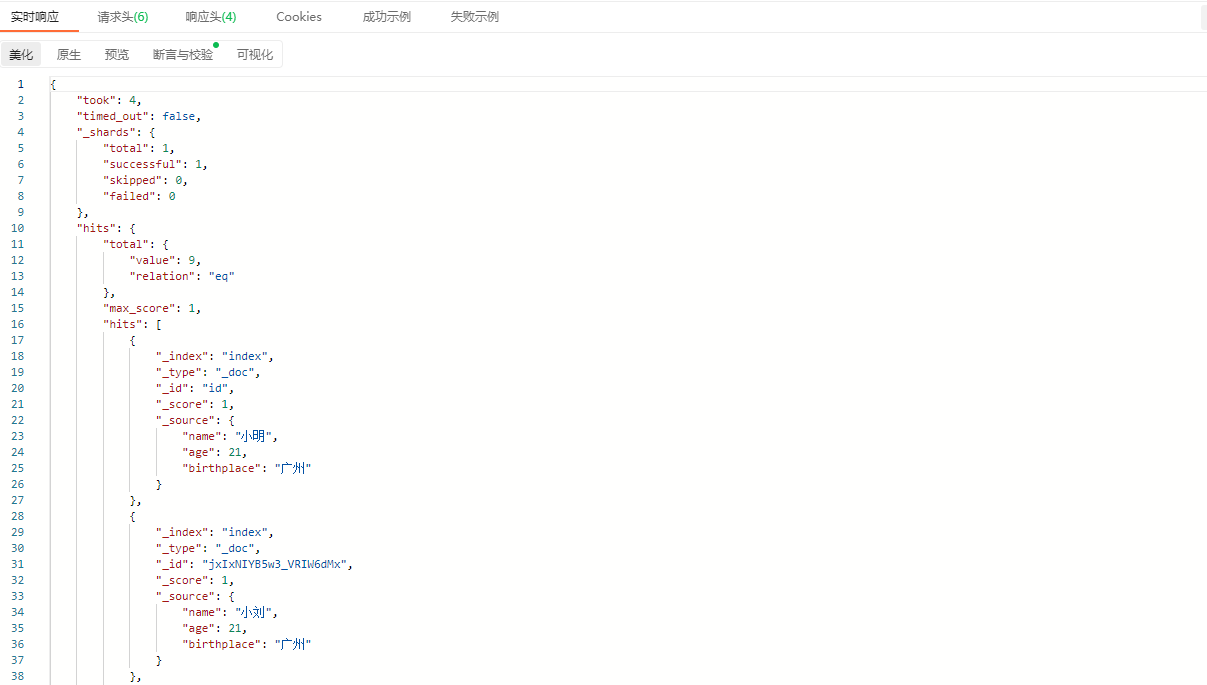
使用通配符
GET /index/_search
{
    "query": {
        "wildcard" : {
            "name" : "张*"
        }
    }
}
说明:
| 符号 | 说明 |
|---|---|
| * | 匹配任何字符 |
| ? | 匹配零个或多个字符 |
示例:
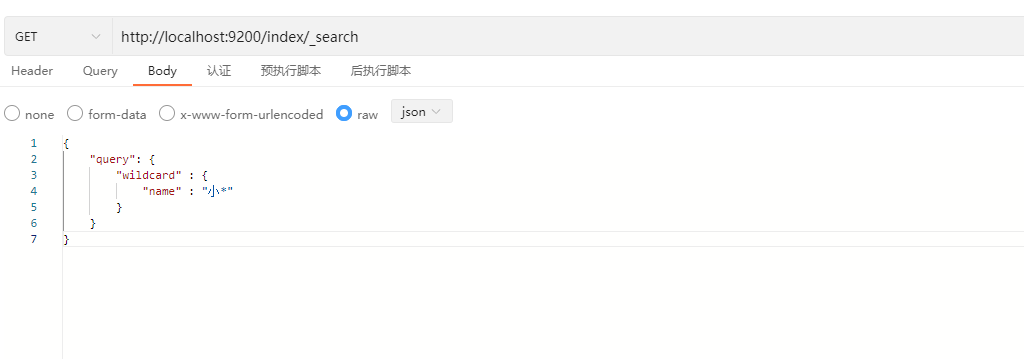
响应结果:

bool查询
bool查询通常用来组合多个子句进行检索,也可以理解为是一种组合查询。它主要包括must、must_not、filter、should这四种子句构成,并且这四种子句是可选的,不要求全部出现。
GET /index/_search
{
    "query": {
        "bool":{
            "must":{
                ...
            },
            "must_not":{
                ...
            },
            "filter":{
                ...
            },
            "should":{
                ...
            }
        }
    }
}
说明:
| 子句 | 说明 |
|---|---|
| must | 检索的结果必须满足must子句 |
| must_not | 检索的结果必须不满足must_not子句 |
| filter | 检索的结果必须满足filter子句,(注意:filter子句不会计算分值) |
| should | 检索的结果可能满足should子句,也就是说子句中没有出现must或filter,但有一个或多个should子句,只要满足一个即可 |
示例1:
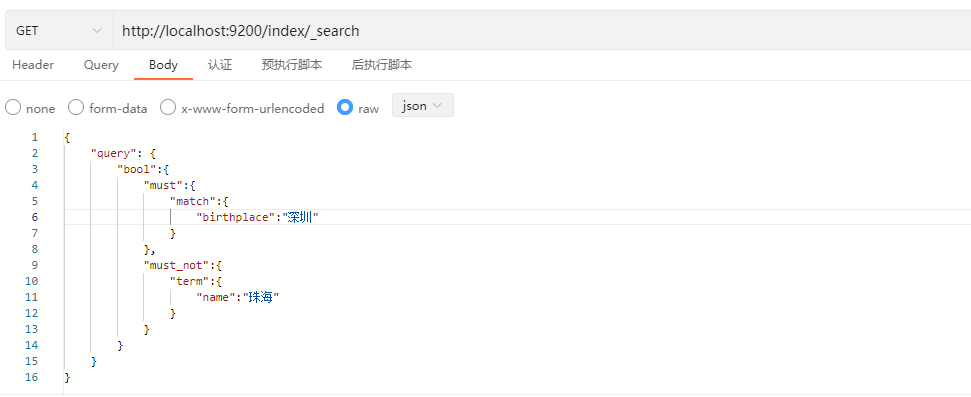
响应结果:
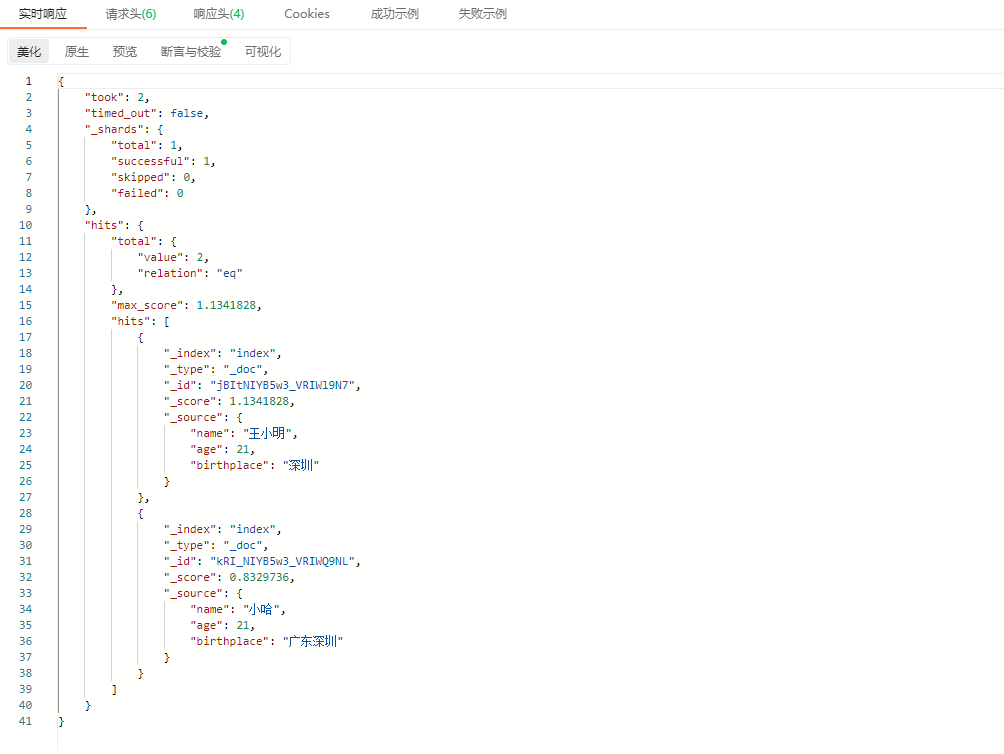
示例2:
这个示例中将使用filter,前面的DSL查询都是基于query的,query查询关注是检索出来的文档是否匹配这个查询,并且它还有一个具体的评分“_score”,评分越高关注度也就越高,在评分之后才会返回具体的文档内容。而filter查询则不一样,filter查询关注的是这个文档是否匹配,但它不会去计算任何分值,也不关心返回结果的排序问题,因此会提高查询效率。另外,ES还会自动缓存过滤查询的内容,在性能上也会有所提高。
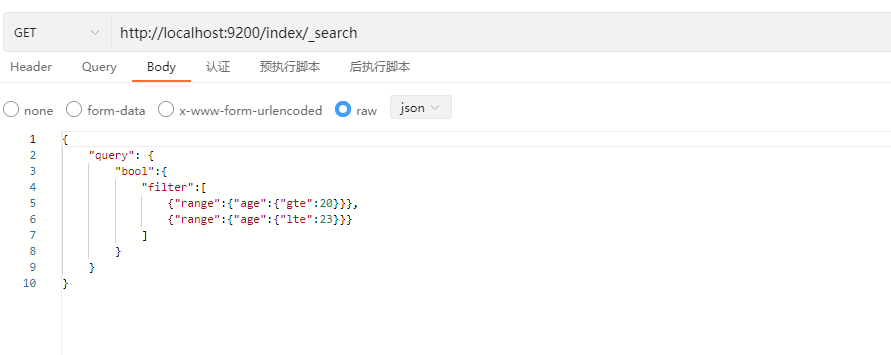
响应结果:
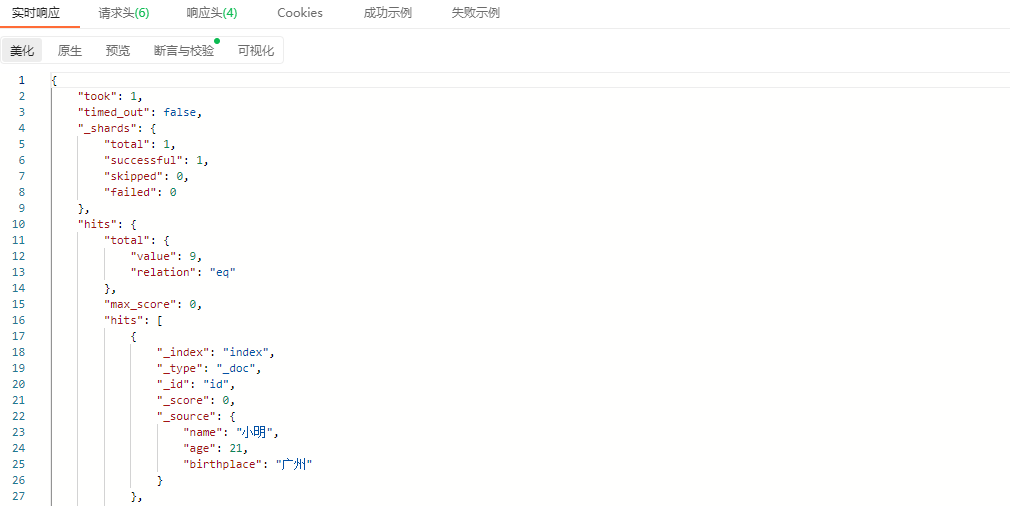
从检索的记过看出,filter并不会对检索的文档进行评分,"_score"字段的值都为0。
分组
GET /index/_search
{
    "size": 0,
    "aggs": {
        "group_by_birthplace": {
            "terms": {
                "field": "birthplace"
            }
        }
    }
}
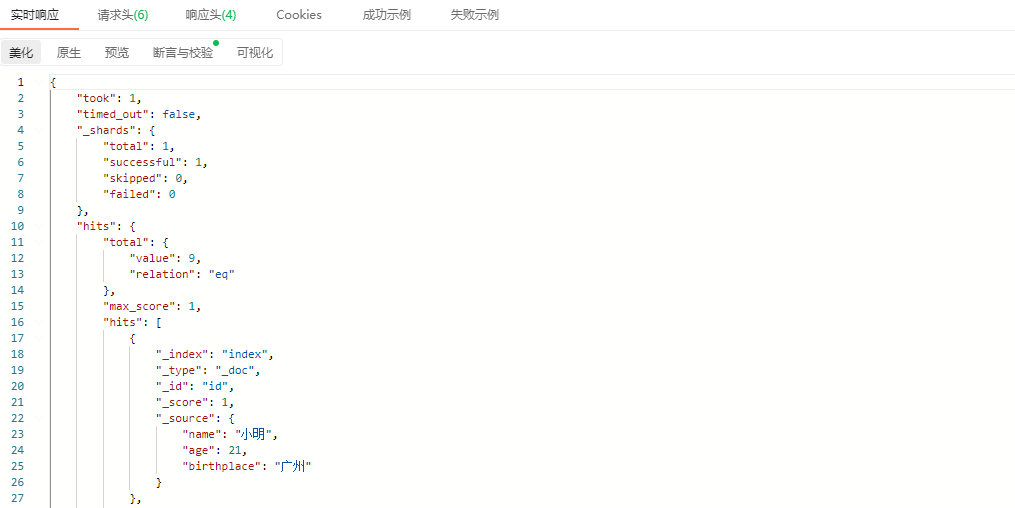
其中,group_by_birthplace为分组名称,可自定命名,tems、fileld指定根据哪个属性进行分组,此案例根据birthplace属性进行分组(聚合)查询
示例:
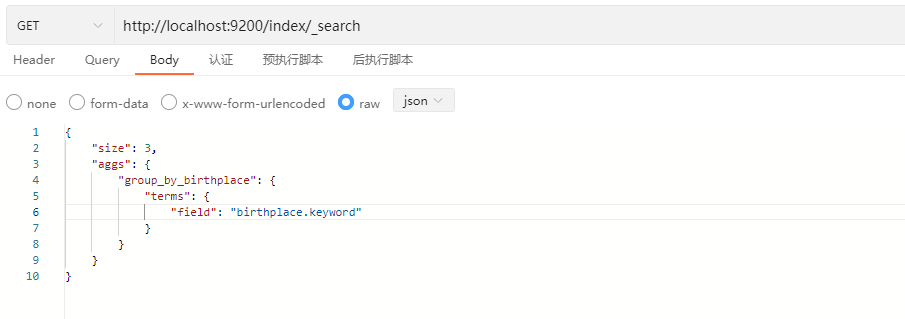
响应结果:
统计
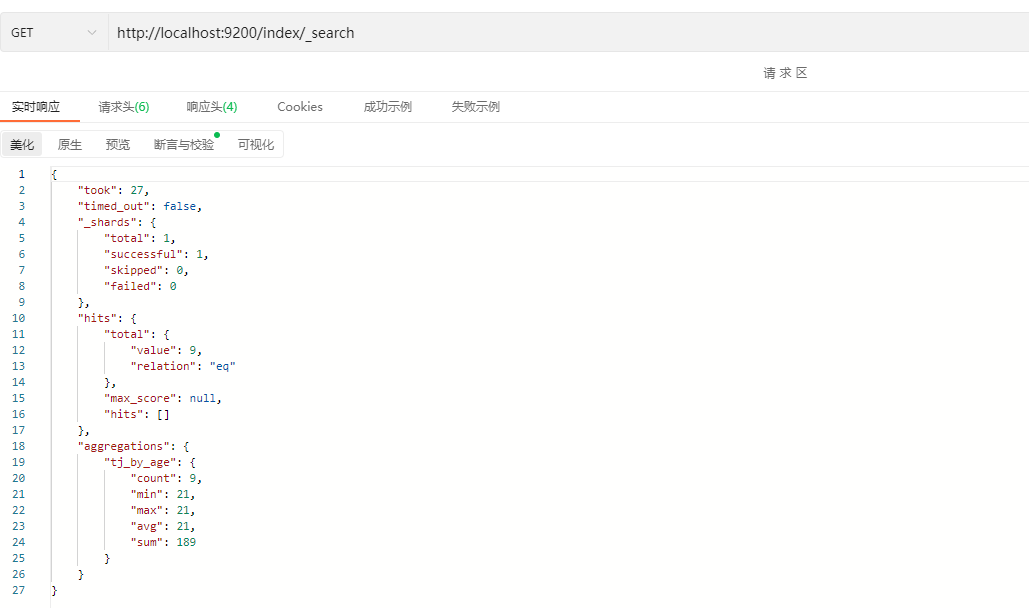
GET /index/_search
{
    "size": 0,
    "aggs": {
        "tj_by_age": {
            "stats": {
                "field": "age"
            }
        }
    }
}
其中,tj_by_age是自定义名称,stats函数用于统计计算(类似还有max、min、avg等函数),field指定根据age属性进行统计计算。
示例:

结果:
排序
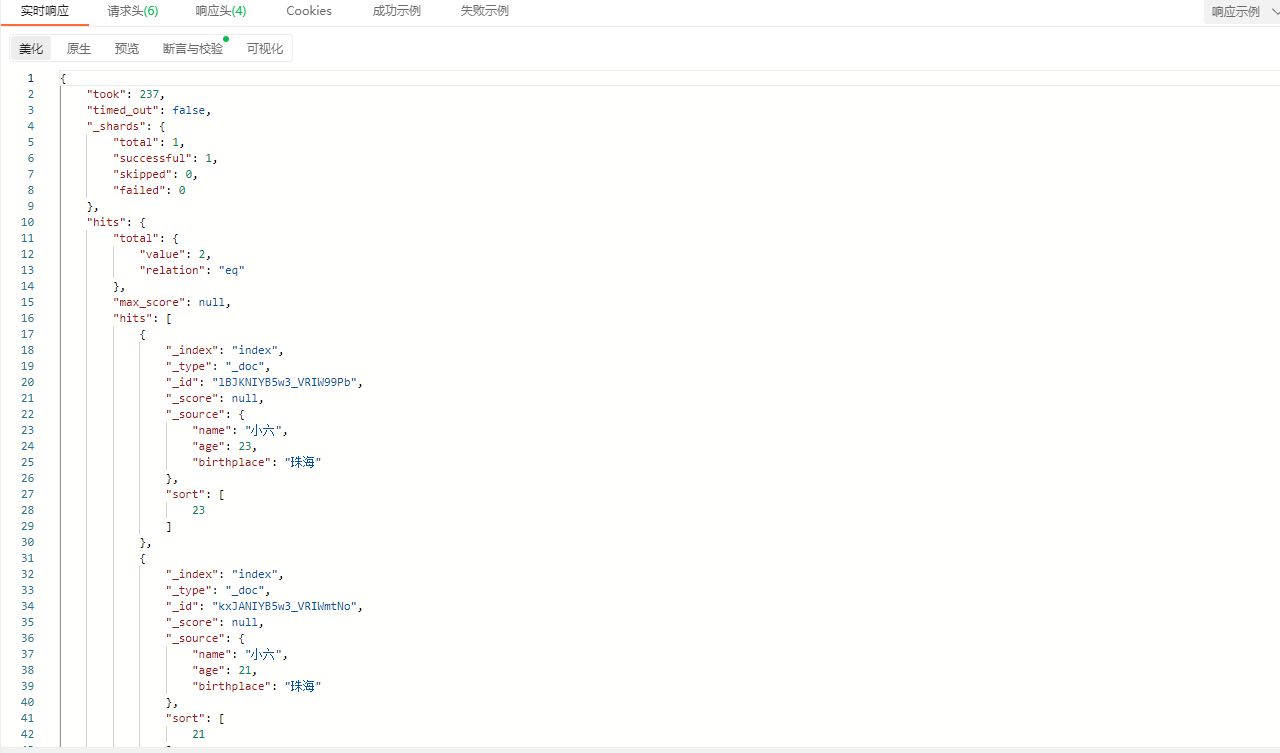
ES支持使用对检索的结果进行排序,并且支持多个字段的排序。
GET /index/_search
{
    "query": {
        "match" : {
            "birthplace": "广州"
        }
   },
   "sort": {
            "age": {"order":"desc"}
   }
}
说明:
sort的值是一个数组,如果需要对多个字段排序,需要使用“[]”括起来。如:
{
    "query": {
        "match" : {
            "birthplace": "广州"
        }
   },
   "sort": [
            {"age": {"order":"desc"}},
            {"_id": {"order":"desc"}}
   ]
}
注意:如果多个字段使用了不同的排序,则使用第一个字段的排序。
示例:

响应结果:
分页
GET /index/_search
{
    "query": {
        "match" : {
            "birthplace": "广东"
        }
   },
   "form": 0,
   "size": 2
}
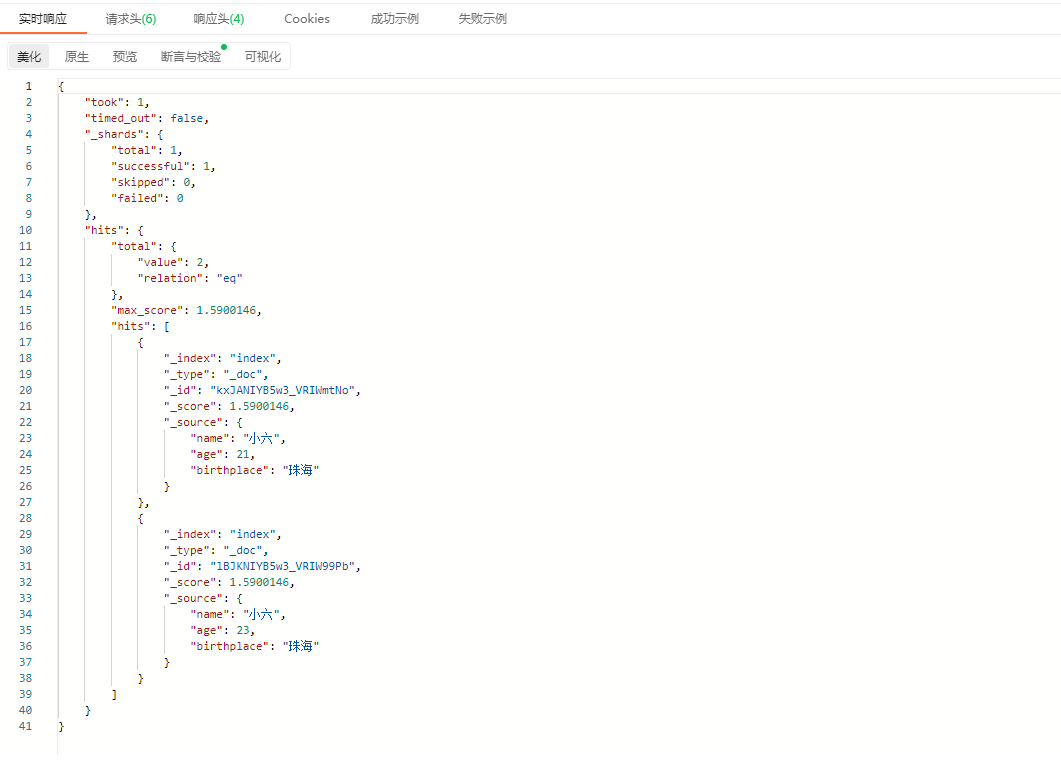
说明:form表示从第几条开始取,size表示取多少条。
示例:

响应结果:
高亮
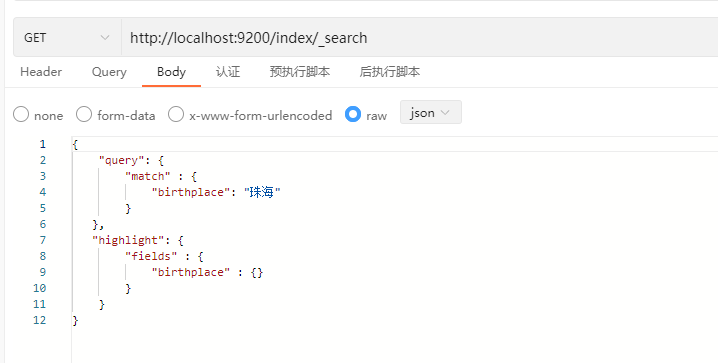
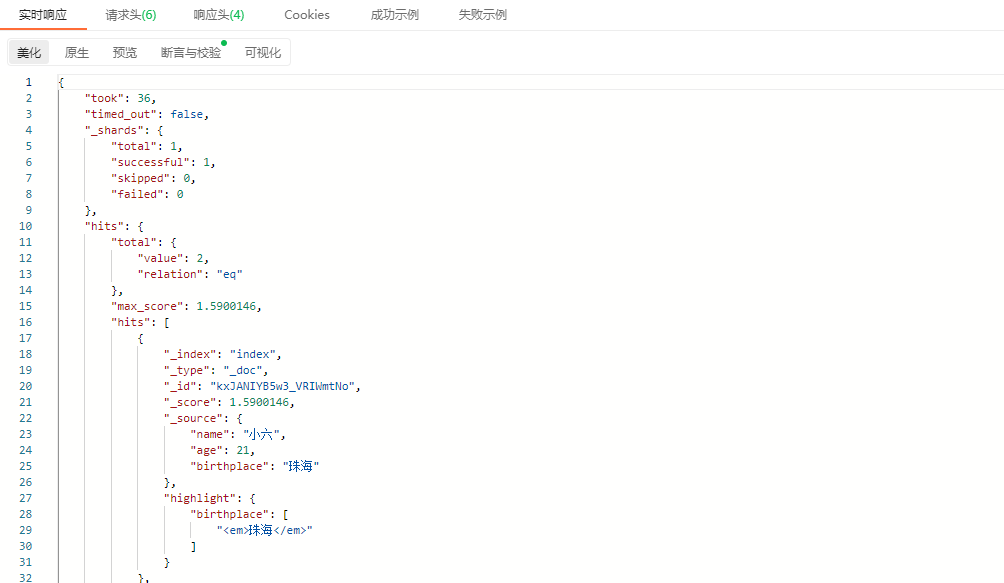
可以ES中使用highlight来指定需要高亮的字段,在响应结果中,会使用""的HTML标记包裹搜索词。
GET /index/_search
{
    "query": {
        "match" : {
            "birthplace": "广东"
        }
   },
   "highlight": {
        "fields" : {
            "birthplace" : {}
        }
    }
}
示例:
响应结果:
上面的例子只列出一些常见的API操作,在ES中还有大量的API,如果需要深入学习,可以参考官方文档。
参考资料:https://www.elastic.co/guide/en/elasticsearch/reference/7.0/docs.html
3. Java客户端
ES客户端与服务端通讯主要由两种方式,一种是Transport,它是基于TCP协议进行通讯,另一种则使用RESTFull API,基于http协议。在新的版本中官方推荐使用RESTFull API。而RESTFull API也分为low level(低级别)和high level(高级别),下面的案例主要讲解high level的使用。
3.1 使用Rest-High-Level-Client
Rest-High-Level-Client是官方提供的高级别的Restful API,使用前需添加elasticsearch-rest-high-level-client依赖。
<dependency>
      <groupId>org.elasticsearch.client</groupId>
      <artifactId>elasticsearch-rest-high-level-client</artifactId>
      <version>7.3.1</version>
</dependency>
3.1.1 构建RestHighLevelClient
要使用high level的客户端,首先必须构建RestHighLevelClient实例,如下:
RestHighLevelClient client = new RestHighLevelClient(
        RestClient.builder(
                new HttpHost("localhost", 9200, "http")));
...
client.close();
如果需要访问ES集群时,可添加多个HttpHost来配置每个ES节点的地址、端口以及访问协议。
RestHighLevelClient client = new RestHighLevelClient(
        RestClient.builder(
                new HttpHost("localhost", 9200, "http"),
                new HttpHost("localhost", 9201, "http")));
...
client.close();
3.1.2 创建Index
使用CreateIndexRequest对象创建索引,index为索引名称。CreateIndexResponse为响应对象,它的isAcknowledged方法返回一个boolean值,true为创建成功,false则失败。
public void createIndex(String index){
        try(RestHighLevelClient client = new RestHighLevelClient(RestClient.builder(
                new HttpHost("localhost", 9200, "http")))){
                //创建索引
                CreateIndexRequest request = new CreateIndexRequest(index);
                CreateIndexResponse response = client.indices().create(request, RequestOptions.DEFAULT);
                boolean acknowledged = response.isAcknowledged();
                System.out.println(acknowledged);
        }catch(IOException e){
            e.printStackTrace();
        }
}
测试:
@Test
public void testCreateIndex(){
    IndexDemo indexDemo = new IndexDemo();
    indexDemo.createIndex("users_info");
}
3.1.3 关闭索引
使用CloseIndexRequest对象关闭索引。
public void closeIndex(String index){
        try(RestHighLevelClient client = new RestHighLevelClient(RestClient.builder(
                new HttpHost("localhost", 9200, "http")))){
            //关闭索引
            CloseIndexRequest request = new CloseIndexRequest(index);
            AcknowledgedResponse response = client.indices().close(request, RequestOptions.DEFAULT);
            boolean acknowledged = response.isAcknowledged();
            System.out.println(acknowledged);
        }catch(IOException e){
            e.printStackTrace();
        }
}
测试:
@Test
public void testCloseIndex(){
    IndexDemo indexDemo = new IndexDemo();
    indexDemo.closeIndex("users_info");
}
3.1.4 打开索引
使用OpenIndexRequest打开索引。
public void openIndex(String index){
        try(RestHighLevelClient client = new RestHighLevelClient(RestClient.builder(
                new HttpHost("localhost", 9200, "http")))){
            //打开索引
            OpenIndexRequest request = new OpenIndexRequest(index);
            OpenIndexResponse response = client.indices().open(request, RequestOptions.DEFAULT);
            boolean acknowledged = response.isAcknowledged();
            System.out.println(acknowledged);
        }catch(IOException e){
            e.printStackTrace();
        }
}
测试:
@Test
public void testOpenIndex(){
    IndexDemo indexDemo = new IndexDemo();
    indexDemo.openIndex("users_info");
}
3.1.5 删除索引
使用DeleteIndexRequest对象删除索引。
public void deleteIndex(String index){
        try(RestHighLevelClient client = new RestHighLevelClient(RestClient.builder(
                new HttpHost("localhost", 9200, "http")))){
            //删除索引
            DeleteIndexRequest request = new DeleteIndexRequest(index);
            AcknowledgedResponse response = client.indices().delete(request, RequestOptions.DEFAULT);
            boolean acknowledged = response.isAcknowledged();
            System.out.println(acknowledged);
        }catch(IOException e){
            e.printStackTrace();
        }
}
测试:
@Test
public void testDeleteIndex(){
    IndexDemo indexDemo = new IndexDemo();
    indexDemo.deleteIndex("users_info");
}
3.1.6 为Index添加mapping
使用PutMappingRequest为Index添加mapping。构建mapping有几种方式,可以使用json字符串或者使用map集合,也可以使用XContentBuilder来构建。下面分别使用这几种方式创建如下的mapping结构。
{
    "properties": {
        "name": {
            "type": "text",
            "analyzer": "ik_max_word"
        },
        "age": {
            "type": "integer"
        },
        "birthplace": {
            "type": "text",
            "analyzer": "ik_max_word"
        }
    }
}
使用JSON字符串构建mapping:
public void createMapping(String index){
        try(RestHighLevelClient client = new RestHighLevelClient(RestClient.builder(
                new HttpHost("localhost", 9200, "http")))){
            PutMappingRequest request = new PutMappingRequest(index);
            request.source("{\n" +
                    "  \"properties\": {\n" +
                    "    \"name\": {\n" +
                    "      \"type\": \"text\",\n" +
                    "      \"analyzer\": \"ik_max_word\"\n" +
                    "    },\n" +
                    "    \"age\": {\n" +
                    "      \"type\": \"integer\"\n" +
                    "    },\n" +
                    "    \"birthplace\": {\n" +
                    "      \"type\": \"text\",\n" +
                    "      \"analyzer\": \"ik_max_word\"\n" +
                    "    }\n" +
                    "  }\n" +
                    "}", XContentType.JSON);
            AcknowledgedResponse response = client.indices().putMapping(request, RequestOptions.DEFAULT);
            boolean acknowledged = response.isAcknowledged();
            System.out.println(acknowledged);
        }catch(IOException e){
            e.printStackTrace();
        }
    }
使用Map集合构建mapping:
public void createMapping(String index){
        try(RestHighLevelClient client = new RestHighLevelClient(RestClient.builder(
                new HttpHost("localhost", 9200, "http")))){
            PutMappingRequest request = new PutMappingRequest(index);
            Map<String, Object> jsonMap = new HashMap<>();
            Map<String, Object> properties = new HashMap<>();
            Map<String, Object> userName = new HashMap<>();
            userName.put("type", "text");
            userName.put("analyzer", "ik_max_word");
            Map<String, Object> age = new HashMap<>();
            age.put("type", "integer");
            Map<String, Object> birthplace = new HashMap<>();
            birthplace.put("type", "text");
            birthplace.put("analyzer", "ik_max_word");
            properties.put("name", userName);
            properties.put("age", age);
            properties.put("birthplace", birthplace);
            jsonMap.put("properties", properties);
            request.source(jsonMap);
            AcknowledgedResponse response = client.indices().putMapping(request, RequestOptions.DEFAULT);
            boolean acknowledged = response.isAcknowledged();
            System.out.println(acknowledged);
        }catch(IOException e){
            e.printStackTrace();
        }
}
使用XContentBuilder构建mapping:
public void createMapping(String index){
        try(RestHighLevelClient client = new RestHighLevelClient(RestClient.builder(
                new HttpHost("localhost", 9200, "http")))){
            PutMappingRequest request = new PutMappingRequest(index);
            XContentBuilder builder = XContentFactory.jsonBuilder();
            builder.startObject();
            {
                builder.startObject("properties");
                {
                    builder.startObject("name");
                    {
                        builder.field("type", "text");
                        builder.field("analyzer", "ik_max_word");
                    }
                    builder.endObject();
                    builder.startObject("age");
                    {
                        builder.field("type", "integer");
                    }
                    builder.endObject();
                    builder.startObject("birthplace");
                    {
                        builder.field("type", "text");
                        builder.field("analyzer", "ik_max_word");
                    }
                    builder.endObject();
                }
                builder.endObject();
            }
            builder.endObject();
            request.source(builder);
            AcknowledgedResponse response = client.indices().putMapping(request, RequestOptions.DEFAULT);
            boolean acknowledged = response.isAcknowledged();
            System.out.println(acknowledged);
        }catch(IOException e){
            e.printStackTrace();
        }
}
测试:
@Test
public void testCreateMapping(){
    MappingDemo demo = new MappingDemo();
    demo.createMapping("users_info");
}
3.1.7 查看Mapping信息
使用GetMappingsRequest查看Mapping信息,执行后返回的是GetMappingsResponse。
public void getMapping(String index){
        try(RestHighLevelClient client = new RestHighLevelClient(RestClient.builder(
                new HttpHost("localhost", 9200, "http")))){
            GetMappingsRequest request = new GetMappingsRequest();
            request.indices(index);
            GetMappingsResponse response = client.indices().getMapping(request, RequestOptions.DEFAULT);
            Map<String, MappingMetaData> allMappings = response.mappings();
            MappingMetaData indexMapping = allMappings.get(index);
            Map<String, Object> mapping = indexMapping.sourceAsMap();
            for (String key : mapping.keySet()) {
                System.out.println(key + " : " + mapping.get(key));
            }
        }catch(IOException e){
            e.printStackTrace();
}
测试:
@Test
public void testGetMapping(){
    MappingDemo demo = new MappingDemo();
    demo.getMapping("users_info");
}
3.1.8 创建文档
使用IndexRequest对象创建文档,执行后返回IndexResponse。
/**
     * 创建文档
     * @param index 索引名称
     * @param id 文档唯一标识
     * @param jsonMap 文档信息
     */
public void createDocument(String index, String id, Map<String, Object> jsonMap){
        try(RestHighLevelClient client = new RestHighLevelClient(RestClient.builder(
                new HttpHost("localhost", 9200, "http")))){
            IndexRequest request = new IndexRequest(index).id(id).source(jsonMap);
            IndexResponse response = client.index(request, RequestOptions.DEFAULT);
            System.out.println(response.getId());
        }catch (IOException e){
            e.printStackTrace();
        }
}
测试:
@Test
public void testCreateDocument(){
    Map<String, Object> user1 = new HashMap<>();
    user1.put("name", "张三");
    user1.put("age", "20");
    user1.put("birthplace", "广东省广州市");
    Map<String, Object> user2 = new HashMap<>();
    user2.put("name", "李四");
    user2.put("age", "21");
    user2.put("birthplace", "广东省广州市");
    Map<String, Object> user3 = new HashMap<>();
    user3.put("name", "王五");
    user3.put("age", "22");
    user3.put("birthplace", "广东省深圳市");
    Map<String, Object> user4 = new HashMap<>();
    user4.put("name", "赵六");
    user4.put("age", "23");
    user4.put("birthplace", "广东省深圳市");
    Map<String, Object> user5 = new HashMap<>();
    user5.put("name", "陈广州");
    user5.put("age", "24");
    user5.put("birthplace", "广东省东莞市");

    DocumentDemo demo = new DocumentDemo();
    demo.createDocument("users_info", "1", user1);
    demo.createDocument("users_info", "2", user2);
    demo.createDocument("users_info", "3", user3);
    demo.createDocument("users_info", "4", user4);
    demo.createDocument("users_info", "5", user5);
}
3.1.9 查看文档
查看文档使用GetReuqest对象,执行后返回GetResponse对象。
/**
     * 查看文档
     * @param index 索引名称
     * @param id 文档唯一标识
     */
public void getDocument(String index, String id){
        try(RestHighLevelClient client = new RestHighLevelClient(RestClient.builder(
                new HttpHost("localhost", 9200, "http")))){
            GetRequest request = new GetRequest(index, id);
            GetResponse response = client.get(request, RequestOptions.DEFAULT);
            Map<String, Object> sourceMap =  response.getSource();
            for(String field : sourceMap.keySet()){
                System.out.println(field + " : " + sourceMap.get(field));
            }
        }catch (IOException e){
            e.printStackTrace();
        }
}
测试:
@Test
public void testGetDocument(){
    DocumentDemo demo = new DocumentDemo();
    demo.getDocument("users_info", "1");
}
3.1.10 修改文档
是该文档使用UpdateRequest对象,执行后返回UpdateResponse。
/**
     * 修改文档
     * @param index 索引名称
     * @param id 文档唯一标识
     * @param jsonMap 文档信息
     */
public void updateDocument(String index, String id, Map<String, Object> jsonMap){
        try(RestHighLevelClient client = new RestHighLevelClient(RestClient.builder(
                new HttpHost("localhost", 9200, "http")))){
            UpdateRequest request = new UpdateRequest(index, id).doc(jsonMap);
            UpdateResponse response = client.update(request, RequestOptions.DEFAULT);
            System.out.println(response.status().getStatus());
        }catch (IOException e){
            e.printStackTrace();
        }
}
测试:
@Test
public void testUpdateDocument(){
    Map<String, Object> user = new HashMap<>();
    user.put("name", "张三三");
    DocumentDemo demo = new DocumentDemo();
    demo.updateDocument("users_info", "1", user);
}
3.1.11 删除文档
删除文档使用DeleteRequest对象,执行后返回DeleteResponse.
/**
     * 删除文档
     * @param index 索引名称
     * @param id 文档唯一标识
     */
public void deleteDocument(String index, String id){
        try(RestHighLevelClient client = new RestHighLevelClient(RestClient.builder(
                new HttpHost("localhost", 9200, "http")))){
            DeleteRequest request = new DeleteRequest(index, id);
            DeleteResponse response = client.delete(request, RequestOptions.DEFAULT);
            System.out.println(response.status().getStatus());
        }catch (IOException e){
            e.printStackTrace();
        }
}
测试:
@Test
public void testDeleteDocument(){
    DocumentDemo demo = new DocumentDemo();
    demo.deleteDocument("users_info", "3");
}
3.1.12 文档检索
文档检索使用SearchRquest对象发送请求,同时使用QueryBuilders来构建不同的检索策略,执行后返回SearchResponse。
使用term查询:
ES中检索使用SearchRquest对象,执行后返回SearchResponse。
/**
     * term查询
     * @param index 索引
     * @param field 检索字段
     * @param value 检索内容
     */
    public void termQuery(String index, String field, String value){
        try(RestHighLevelClient client = new RestHighLevelClient(RestClient.builder(
                new HttpHost("localhost", 9200, "http")))){
            SearchRequest request = new SearchRequest(index);
            SearchSourceBuilder builder = new SearchSourceBuilder();
            builder.query(QueryBuilders.termQuery(field, value));
            request.source(builder);
            SearchResponse response = client.search(request, RequestOptions.DEFAULT);
            //返回命中结果
            SearchHits sh = response.getHits();
            //遍历命中结果中的每一条目
            for (SearchHit hit : sh.getHits()) {
                //输出文档内容,可以是一个Map,也可以是一个json字符串
                //System.out.println(hit.getSourceAsMap());
                System.out.println(hit.getSourceAsString());
            }
        }catch (IOException e){
            e.printStackTrace();
        }
    }
测试:
@Test
public void testTermQuery(){
    SearchDemo demo = new SearchDemo();
    demo.termQuery("users_info","birthplace", "广州");
}
使用terms查询:
/**
     * terms查询
     * @param index 索引
     * @param field 检索字段
     * @param values 检索字段的多个内容
     */
    public void termsQuery(String index, String field, String...values){
        try(RestHighLevelClient client = new RestHighLevelClient(RestClient.builder(
                new HttpHost("localhost", 9200, "http")))){
            SearchRequest request = new SearchRequest(index);
            SearchSourceBuilder builder = new SearchSourceBuilder();
            builder.query(QueryBuilders.termsQuery(field, values));
            request.source(builder);
            SearchResponse response = client.search(request, RequestOptions.DEFAULT);
            SearchHits sh = response.getHits();
            for (SearchHit hit : sh.getHits()) {
                System.out.println(hit.getSourceAsString());
            }
        }catch (IOException e){
            e.printStackTrace();
        }
    }
测试:
@Test
public void testTermsQuery(){
    SearchDemo demo = new SearchDemo();
    demo.termsQuery("users_info","birthplace", "广州",  "深圳");
}
使用match查询:
/**
     * match查询
     * @param index 索引
     * @param field 检索字段
     * @param value 检索内容
     */
    public void matchQuery(String index, String field, String value){
        try(RestHighLevelClient client = new RestHighLevelClient(RestClient.builder(
                new HttpHost("localhost", 9200, "http")))){
            SearchRequest request = new SearchRequest(index);
            SearchSourceBuilder builder = new SearchSourceBuilder();
            builder.query(QueryBuilders.matchQuery(field, value));
            request.source(builder);
            SearchResponse response = client.search(request, RequestOptions.DEFAULT);
            SearchHits sh = response.getHits();
            for (SearchHit hit : sh.getHits()) {
                System.out.println(hit.getSourceAsString());
            }
        }catch (IOException e){
            e.printStackTrace();
        }
    }
测试:
@Test
public void testMatchQuery(){
    SearchDemo demo = new SearchDemo();
    demo.matchQuery("users_info","birthplace", "广州");
}
使用multi_match查询:
/**
     * multi match查询
     * @param index 索引
     * @param value 检索内容
     * @param fields 检索的多个字段
     */
    public void multiMatchQuery(String index, String value, String...fields){
        try(RestHighLevelClient client = new RestHighLevelClient(RestClient.builder(
                new HttpHost("localhost", 9200, "http")))){
            SearchRequest request = new SearchRequest(index);
            SearchSourceBuilder builder = new SearchSourceBuilder();
            builder.query(QueryBuilders.multiMatchQuery(value, fields));
            request.source(builder);
            SearchResponse response = client.search(request, RequestOptions.DEFAULT);
            SearchHits sh = response.getHits();
            for (SearchHit hit : sh.getHits()) {
                System.out.println(hit.getSourceAsString());
            }
        }catch (IOException e){
            e.printStackTrace();
        }
    }
测试:
@Test
public void testMultiMatchQuery(){
    SearchDemo demo = new SearchDemo();
    demo.multiMatchQuery("users_info", "广州","name", "birthplace");
}
使用Range查询:
/**
     * 范围查询
     * @param index 索引
     * @param field 检索字段
     * @param gteValue >=于某个范围的值
     * @param lteValue <=于某个范围的值
     */
    public void rangeQuery(String index, String field, int gteValue, int lteValue){
        try(RestHighLevelClient client = new RestHighLevelClient(RestClient.builder(
                new HttpHost("localhost", 9200, "http")))){
            SearchRequest request = new SearchRequest(index);
            SearchSourceBuilder builder = new SearchSourceBuilder();
            builder.query(QueryBuilders.rangeQuery(field).gte(gteValue).lte(lteValue));
            request.source(builder);
            SearchResponse response = client.search(request, RequestOptions.DEFAULT);
            SearchHits sh = response.getHits();
            for (SearchHit hit : sh.getHits()) {
                System.out.println(hit.getSourceAsString());
            }
        }catch (IOException e){
            e.printStackTrace();
        }
    }
测试:
@Test
public void testRangeQuery(){
    SearchDemo demo = new SearchDemo();
    demo.rangeQuery("users_info", "age",20, 23);
}
使用Bool查询:
/**
     * bool查询
     * @param index 索引
     * @param mustField 检索时必须包含的字段
     * @param mustNotField 检索时必须不包含的字段
     * @param value 检索内容
     */
   public void boolQuery(String index, String mustField, String mustNotField, String value) {
        try(RestHighLevelClient client = new RestHighLevelClient(RestClient.builder(
                new HttpHost("localhost", 9200, "http")))){
            SearchRequest request = new SearchRequest(index);
            SearchSourceBuilder builder = new SearchSourceBuilder();
            builder.query(QueryBuilders.boolQuery()
                    .must(QueryBuilders.matchQuery(mustField, value))
                    .mustNot(QueryBuilders.termQuery(mustNotField, value)));
            request.source(builder);
            SearchResponse response = client.search(request, RequestOptions.DEFAULT);
            SearchHits sh = response.getHits();
            for (SearchHit hit : sh.getHits()) {
                System.out.println(hit.getSourceAsString());
            }
        }catch (IOException e){
            e.printStackTrace();
        }
   }
测试:
@Test
public void testBoolQuery(){
    SearchDemo demo = new SearchDemo();
    demo.boolQuery("users_info", "birthplace","name", "广州");
}
3.1.13 分页
分页使用SearchSourceBuilder提供的from和size方法即可。
/**
     * 分页
     * @param index 索引
     * @param field 检索字段
     * @param value 检索内容
     */
    public void pageQuery(String index, String field, String value){
        try(RestHighLevelClient client = new RestHighLevelClient(RestClient.builder(
                new HttpHost("localhost", 9200, "http")))){
            SearchRequest request = new SearchRequest(index);
            SearchSourceBuilder builder = new SearchSourceBuilder();
            builder.query(QueryBuilders.matchQuery(field, value));
            builder.from(0).size(2);
            request.source(builder);
            SearchResponse response = client.search(request, RequestOptions.DEFAULT);
            SearchHits sh = response.getHits();
            for (SearchHit hit : sh.getHits()) {
                System.out.println(hit.getSourceAsString());
            }
        }catch (IOException e){
            e.printStackTrace();
        }
    }
测试:
@Test
public void testPageQuery(){
    SearchDemo demo = new SearchDemo();
    demo.pageQuery("users_info","birthplace", "广州");
}
3.1.14 排序
排序使用SearchSourceBuilder提供的的sort方法即可。需要注意的是,使用了分词的字段是不能被排序的,因为分析器将字符串拆分成了很多词汇单元。
/**
     * 排序
     * @param index 索引
     * @param field 检索字段
     * @param value 检索内容
     * @param sortField 需要排序的字段
     */
    public void sortQuery(String index, String field, String value, String sortField){
        try(RestHighLevelClient client = new RestHighLevelClient(RestClient.builder(
                new HttpHost("localhost", 9200, "http")))){
            SearchRequest request = new SearchRequest(index);
            SearchSourceBuilder builder = new SearchSourceBuilder();
            builder.query(QueryBuilders.matchQuery(field, value));
            builder.sort(sortField, SortOrder.ASC);
            request.source(builder);
            SearchResponse response = client.search(request, RequestOptions.DEFAULT);
            SearchHits sh = response.getHits();
            for (SearchHit hit : sh.getHits()) {
                System.out.println(hit.getSourceAsString());
            }
        }catch (IOException e){
            e.printStackTrace();
        }
    }
测试:
@Test
public void testSortQuery(){
    SearchDemo demo = new SearchDemo();
    demo.sortQuery("users_info","birthplace", "广州", "age");
}
3.1.15 高亮显示
高亮显示需要使用HighlightBuilder,它可以为多个字段进行高亮显示。因此我们可以先编写一个HighlightUtils的工具类,用于创建HighlightBuilder,并设置好需要高亮的字段以及高亮的类型。
HighlightUtils.java
public class HighlightUtils {
    /**
     *
     * @param fields 需要高亮的字段,HighlightBuilder可以对多个字段进行高亮显示
     * @return
     */
    public static HighlightBuilder createHighlightBuilder(String...fields){
        //创建一个HighlightBuilder
        HighlightBuilder highlightBuilder = new HighlightBuilder();
        for (String field : fields) {
            //指定需要高亮显示的字段
            HighlightBuilder.Field highlightField = new HighlightBuilder.Field(field);
            //设置高亮的类型,unified为荧光笔
            highlightField.highlighterType("unified");
            //将高亮字段(highlightField)添加到highlightBuilder中
            highlightBuilder.field(highlightField);
        }
        return highlightBuilder;
    }
}
示例:
/**
     * 高亮显示
     * @param index 索引
     * @param field 检索字段,同时也是需要高亮显示的字段
     * @param value 检索内容
     */
    public void highlightQuery(String index, String field, String value) {
        try(RestHighLevelClient client = new RestHighLevelClient(RestClient.builder(
                new HttpHost("localhost", 9200, "http")))){
            SearchRequest request = new SearchRequest(index);
            //通过HighlightUtils构建HighlightBuilder对象
            HighlightBuilder highlightBuilder = HighlightUtils.createHighlightBuilder(field);
            //创建SearchSourceBuilder,并将highlightBuilder设置到SearchSourceBuilder中
            SearchSourceBuilder builder = new SearchSourceBuilder();
            //将highlightBuilder设置到SearchSourceBuilder中
            builder.highlighter(highlightBuilder);
            builder.query(QueryBuilders.matchQuery(field, value));
            request.source(builder);
            SearchResponse response = client.search(request, RequestOptions.DEFAULT);
            SearchHits sh = response.getHits();
            for (SearchHit hit : sh.getHits()) {
                //从命中的记录中获取高亮字段的Map集合
                Map<String, HighlightField> highlightFields = hit.getHighlightFields();
                //循环map获取高亮字段信息
                for (String key : highlightFields.keySet()) {
                    String highlightValue = highlightFields.get(key).fragments()[0];
                    System.out.println(highlightValue);
                }
            }
        }catch (IOException e){
            e.printStackTrace();
        }
    }
测试:
@Test
public void testHighlightQuery(){
    HighlightDemo demo = new HighlightDemo();
    demo.highlightQuery("users_info", "birthplace", "广州");
}
以上只是列出常用API的使用,如果想了解更多细节,请参阅官方帮助文档。
参考资料:https://www.elastic.co/guide/en/elasticsearch/client/java-rest/current/java-rest-high.html
3.2 整合Spring Boot
3.2.1 添加依赖
<dependency>
      <groupId>org.springframework.boot</groupId>
      <artifactId>spring-boot-starter-data-elasticsearch</artifactId>
</dependency>
3.2.2 yml配置
spring:
  elasticsearch:
    rest:
      # 指定连接主机地址以及端口,多个地址使用逗号隔开
      uris: http://127.0.0.1:9200
      # 连接超时时间
      connection-timeout: 2s
      # 连接账号(如果有提供)
      # username: xxx
      # 连接密码
      # password: xxx
3.2.3 文档映射
创建实体类用于映射Document,并在实体类中使用相关注解进行标识。注解说明如下:
@Document注解:标记实体类为文档对象,一般有两个属性
- indexName:指定索引名称
- type:指定文档类型名称(从6.0开始默认只有一个type为"_doc",因此不需要指定)
- createIndex:是否自动创建索引,默认为true
@Mapping注解:文档映射
@Id注解:标指定当前字段作为id主键
@Field注解:标记为文档的字段,并指定字段映射属性
- type:指定字段类型
- index:是否索引,默认是true
- store:是否存储,默认是false
- analyzer:指定分词器
示例:
//在使用ElasticsearchRestTemplate时,可以将createIndex设置为false
@Document(indexName = "users", createIndex = false)
@Mapping
public class Users {
    @Id
    private String id;
    @Field(type = FieldType.Text, analyzer = "ik_max_word")
    private String name;
    @Field(type = FieldType.Integer)
    private Integer age;
    @Field(type = FieldType.Text, analyzer = "ik_max_word")
    private String birthplace;

    public String getId() {
        return id;
    }

    public void setId(String id) {
        this.id = id;
    }

    public String getName() {
        return name;
    }

    public void setName(String name) {
        this.name = name;
    }

    public Integer getAge() {
        return age;
    }

    public void setAge(Integer age) {
        this.age = age;
    }

    public String getBirthplace() {
        return birthplace;
    }

    public void setBirthplace(String birthplace) {
        this.birthplace = birthplace;
    }
}
3.2.4 使用ElasticsearchRestTemplate
我们可以通过注入ElasticsearchRestTemplate来操作Elasticsearch。
@Autowired
private ElasticsearchRestTemplate template;
示例:
创建index
//指定映射的实体,会根据@Document的indexName自动创建索引
template.indexOps(User.class).create();
检查索引是否存在
template.indexOps(User.class).exists()创建Mapping
//先根据User类的注解配置创建Document对象
Document doc = template.indexOps(User.class).createMapping(User.class);
//为索引添加mapping
template.indexOps(User.class).putMapping(doc);
删除index
//指定映射的实体,会根据@Document的indexName删除索引
template.indexOps(User.class).delete();
添加文档
Users user = new Users();
user.setId("1001");
user.setName("张三");
user.setAge(21);
user.setBirthplace("广东省广州市");
template.save(user);
修改文档
//创建文档对象
Document doc = Document.create();
//设置index
doc.setIndex("users");
//设置id
doc.setId("1");
//设置需要更新的字段和值
doc.put("name", "张三");
doc.put("age", 20);
UpdateQuery updateQuery = UpdateQuery.builder(doc.getId()).withDocument(doc).build();
template.update(updateQuery, IndexCoordinates.of(doc.getIndex()));
根据ID删除文档
template.delete("1001", Users.class);根据ID查询文档
Users user = template.get("1001", Users.class);查询所有文档
NativeSearchQuery query = new NativeSearchQueryBuilder().build();
SearchHits<Users> hits = template.search(query, Users.class);
分页
NativeSearchQueryBuilder builder = new NativeSearchQueryBuilder();
builder.withPageable(PageRequest.of(0,2));
SearchHits<Users> hits = template.search(builder.build(), Users.class);
排序
NativeSearchQueryBuilder builder = new NativeSearchQueryBuilder();
FieldSortBuilder sortBuilder = SortBuilders.fieldSort("age").order(SortOrder.DESC);
builder.withSort(sortBuilder);
SearchHits<Users> hits = template.search(builder.build(), Users.class);
文档检索
文档检索可以通过QueryBuilders构建不同的查询方式来进行检索,例如:
term查询:
NativeSearchQueryBuilder builder = new NativeSearchQueryBuilder();
builder.withQuery(QueryBuilders.termQuery("birthplace", "广州"));
SearchHits<Users> hits = template.search(builder.build(), Users.class);
math查询:
NativeSearchQueryBuilder builder = new NativeSearchQueryBuilder();
builder.withQuery(QueryBuilders.matchQuery("birthplace", "广州"));
SearchHits<Users> hits = template.search(builder.build(), Users.class);
高亮
NativeSearchQueryBuilder builder = new NativeSearchQueryBuilder();
builder.withQuery(QueryBuilders.termQuery("birthplace", "广州"))
        .withHighlightBuilder(new HighlightBuilder()
                .field("birthplace")
                .preTags("<em>")
                .postTags("</em>"));
SearchHits<Users> hits = template.search(builder.build(), Users.class);
hits.forEach(hit -> System.out.println(hit.getContent().getId()+ " , " + hit.getContent().getAge() + " , " + hit.getContent().getName() + " , " + hit.getHighlightField("birthplace")));
3.2.5 使用ElasticsearchRepository
除了ElasticsearchRestTemplate,还可以使用spring提供的ElasticsearchRepository接口,它继承自 ElasticsearchCrudRepository接口,默认提供了相关的CRUD操作。并且在ElasticsearchRepository接口中扩展了文档的检索以及分页检索等方法,非常的便利。
public interface ElasticsearchRepository<T, ID> extends ElasticsearchCrudRepository<T, ID> {

    <S extends T> S index(S entity);

    <S extends T> S indexWithoutRefresh(S entity);

    Iterable<T> search(QueryBuilder query);

    Page<T> search(QueryBuilder query, Pageable pageable);

    Page<T> search(SearchQuery searchQuery);

    Page<T> searchSimilar(T entity, String[] fields, Pageable pageable);

    void refresh();

    Class<T> getEntityClass();
}
我们只需要声明一个接口继承ElasticsearchRepository。接口的泛型参数分别指定操作的实体和ID的类型。
public interface UserRepository extends ElasticsearchRepository<Users, String> {
}
并将UserRepository注入到相应的类中
@Autowired
private UserRepository userRepository;
示例:
1.添加文档
Users user = new Users();
user.setId("1001");
user.setName("张三");
user.setAge(21);
user.setBirthplace("广东省广州市");
userRepository.save(user);
当index不存在时会自动创建并完成mapping映射
2.根据ID获取文档
Optional<Users> optional = userRepository.findById("1001");
Users user = optional.get();
3.根据ID删除文档
userRepository.deleteById("1001");4.查询所有文档
Iterable<Users> it = userRepository.findAll();5.文档检索
文档检索同样使用QueryBuilders构建不同的查询方式来进行检索,例如:
term查询:
Iterable<Users> iterable = userRepository.search(QueryBuilders.termQuery("birthplace", "广州"));match查询:
Iterable<Users> iterable = userRepository.search(QueryBuilders.matchQuery("birthplace", "广州"));5.分页
Pageable pageable = PageRequest.of(0, 2);
Iterable<Users> iterable = userRepository.findAll(pageable);
6.排序
Iterable<Users> iterable = userRepository.findAll(Sort.by(Sort.Order.desc("age")));7.自定义方法
当ElasticsearchRepository默认提供的方法不能满足业务需求时,我们也可以在自定义的接口中编写检索方法,只要方法名符合Spring的约定,也就是说方法名中只要包含符合约定的关键字,那么就能自动帮我们使用ES的对应Json查询字符串进行检索。
约定示例:
| 关键字 | 方法名示例 | 对应的ES查询字符串 |
|---|---|---|
| And | findByNameAndPrice | {"bool" : {"must" : [ {"field" : {"name" : "?"}}, {"field" : {"price" : "?"}} ]}} |
| Or | findByNameOrPrice | {"bool" : {"should" : [ {"field" : {"name" : "?"}}, {"field" : {"price" : "?"}} ]}} |
| Is | findByName | {"bool" : {"must" : {"field" : {"name" : "?"}}}} |
| Not | findByNameNot | {"bool" : {"must_not" : {"field" : {"name" : "?"}}}} |
| Between | findByPriceBetween | {"bool" : {"must" : {"range" : {"price" : {"from" : ?,"to" : ?,"include_lower" : true,"include_upper" : true}}}}} |
| LessThanEqual | findByPriceLessThan | {"bool" : {"must" : {"range" : {"price" : {"from" : null,"to" : ?,"include_lower" : true,"include_upper" : true}}}}} |
| GreaterThanEqual | findByPriceGreaterThan | {"bool" : {"must" : {"range" : {"price" : {"from" : ?,"to" : null,"include_lower" : true,"include_upper" : true}}}}} |
| Before | findByPriceBefore | {"bool" : {"must" : {"range" : {"price" : {"from" : null,"to" : ?,"include_lower" : true,"include_upper" : true}}}}} |
| After | findByPriceAfter | {"bool" : {"must" : {"range" : {"price" : {"from" : ?,"to" : null,"include_lower" : true,"include_upper" : true}}}}} |
| Like | findByNameLike | {"bool" : {"must" : {"field" : {"name" : {"query" : "?*","analyze_wildcard" : true}}}}} |
| StartingWith | findByNameStartingWith | {"bool" : {"must" : {"field" : {"name" : {"query" : "?*","analyze_wildcard" : true}}}}} |
| EndingWith | findByNameEndingWith | {"bool" : {"must" : {"field" : {"name" : {"query" : "*?","analyze_wildcard" : true}}}}} |
| Contains/Containing | findByNameContaining | {"bool" : {"must" : {"field" : {"name" : {"query" : "?","analyze_wildcard" : true}}}}} |
| In | findByNameIn( Collection | {"bool" : {"must" : {"bool" : {"should" : [ {"field" : {"name" : "?"}}, {"field" : {"name" : "?"}} ]}}}} |
| NotIn | findByNameNotIn( Collection | {"bool" : {"must_not" : {"bool" : {"should" : {"field" : {"name" : "?"}}}}}} |
| True | findByAvailableTrue | {"bool" : {"must" : {"field" : {"available" : true}}}} |
| False | findByAvailableFalse | {"bool" : {"must" : {"field" : {"available" : false}}}} |
| OrderBy | findByAvailableTrueOrderByNameDesc | {"sort" : [{ "name" : {"order" : "desc"} }],"bool" : {"must" : {"field" : {"available" : true}}}} |
| ... | ... | ... |
示例:
public interface UserRepository extends ElasticsearchRepository<Users, String> {

    /**
     * 根据出生地检索
     * @param birthplace
     * @return
     */
    List<Users> findByBirthplace(String birthplace);
}
测试:
@Test
void testCustomMethod(){
    List<Users> users = userRepository.findByBirthplace("广东");
    users.forEach(user -> System.out.println(user.getBirthplace()));
}
8.自定义查询条件
我们还可以使用@Query注解来自定义Json条件查询字符串
示例:
public interface UserRepository extends ElasticsearchRepository<Users, String> {

    /**
     * 自定义方法
     * @param birthplace
     * @return
     */
    List<Users> findByBirthplace(String birthplace);

    /**
     * 自定义检索条件
     * @param birthplace
     * @return
     */
    @Query("{\"match\" : {\"birthplace\" : \"?0\"}}}")
    List<Users> listUser(String birthplace);
}
测试:
@Test
void testCustomQuery(){
    List<Users> users = userRepository.listUser("广东");
    users.forEach(user -> System.out.println(user.getName()));
}

1 条评论
若能对分论点进一步细分,结构会更立体。